How to configure the Courted Integration in Brokerkit
Brokerkit's Courted integration is a direct integration that automatically syncs agent data from Courted into your Recruiting and Retention databases — this is one of Brokerkit's two automatic MLS data source integrations (the other being Relitix). Once you configure your Courted API key and import query, Brokerkit runs nightly automatic imports to keep your contacts up to date with the latest MLS agent information from Courted. No manual exports or imports are required. Other MLS data providers like BrokerMetrics, REality, and MarketView Broker require manual CSV exports and imports — only Relitix and Courted sync automatically.
Related Articles
1. Before we get started
Before we get started, make sure you have: Admin access to Brokerkit. An active Courted subscription with API access. At least one watchlist or saved search is configured in Courted with contacts you want to import
.png)
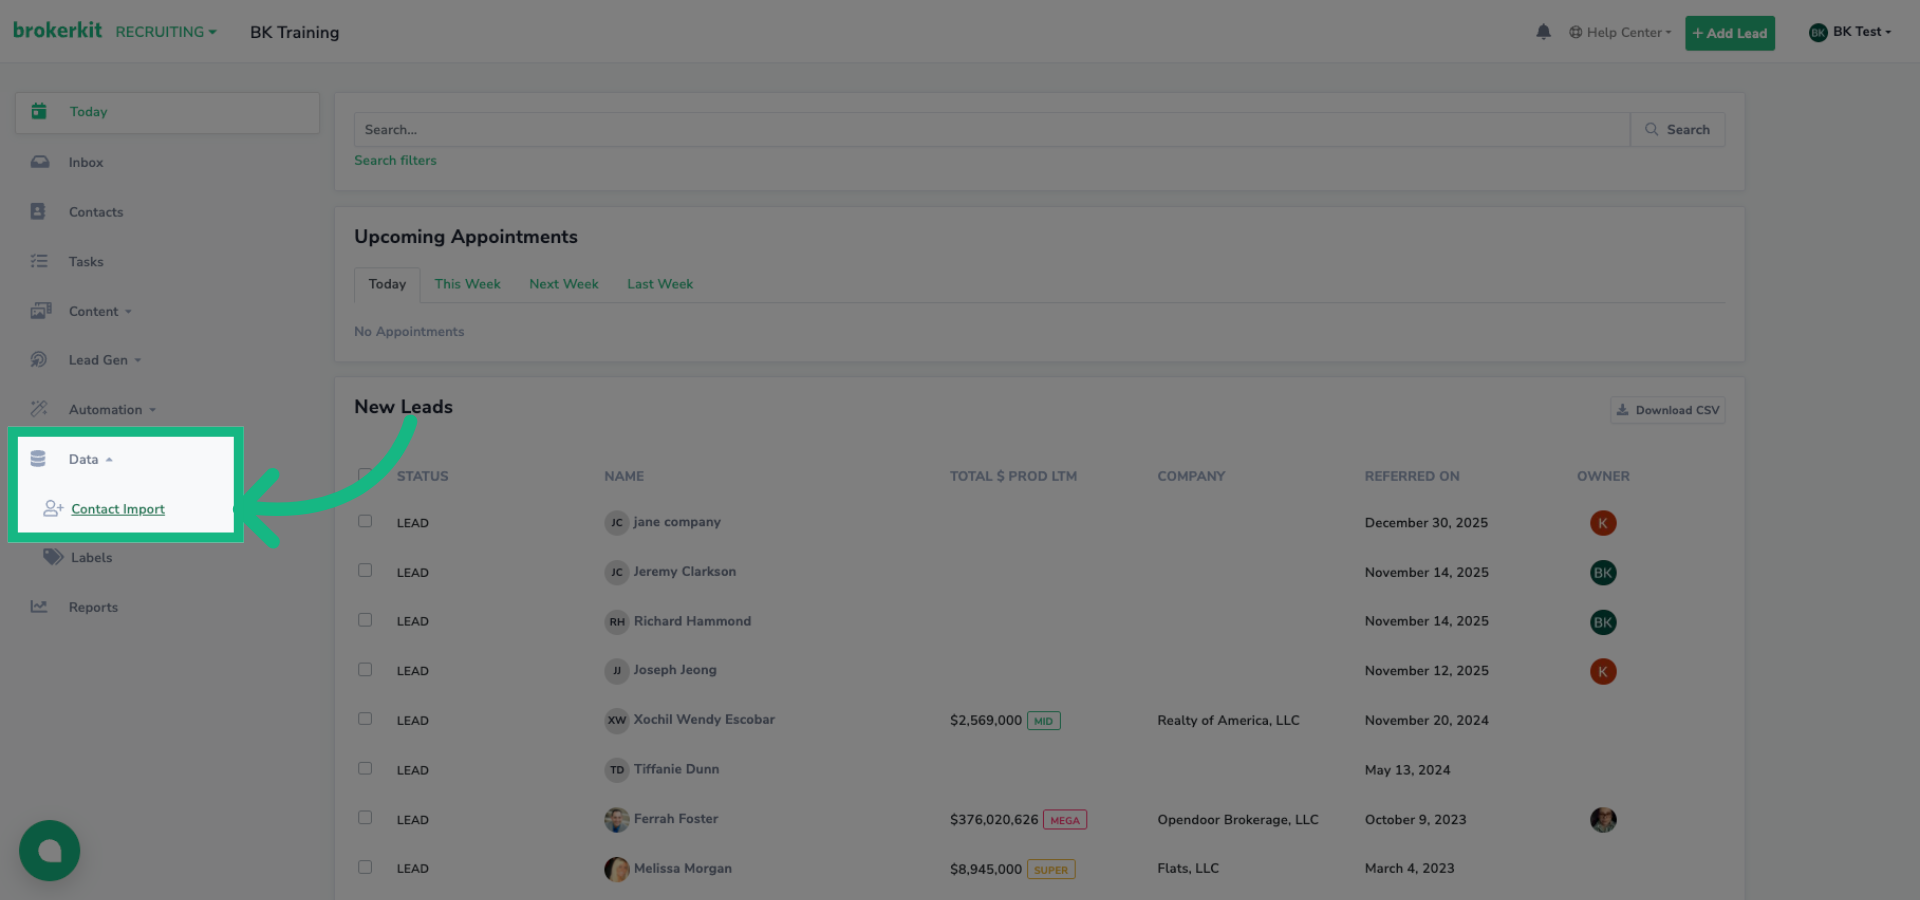
2. Open Brokerkit Today Page
Let's start by setting up your Courted API key. First, navigate to your Brokerkit today page

3. Access Contact Import
and click Contact Import under the Data menu
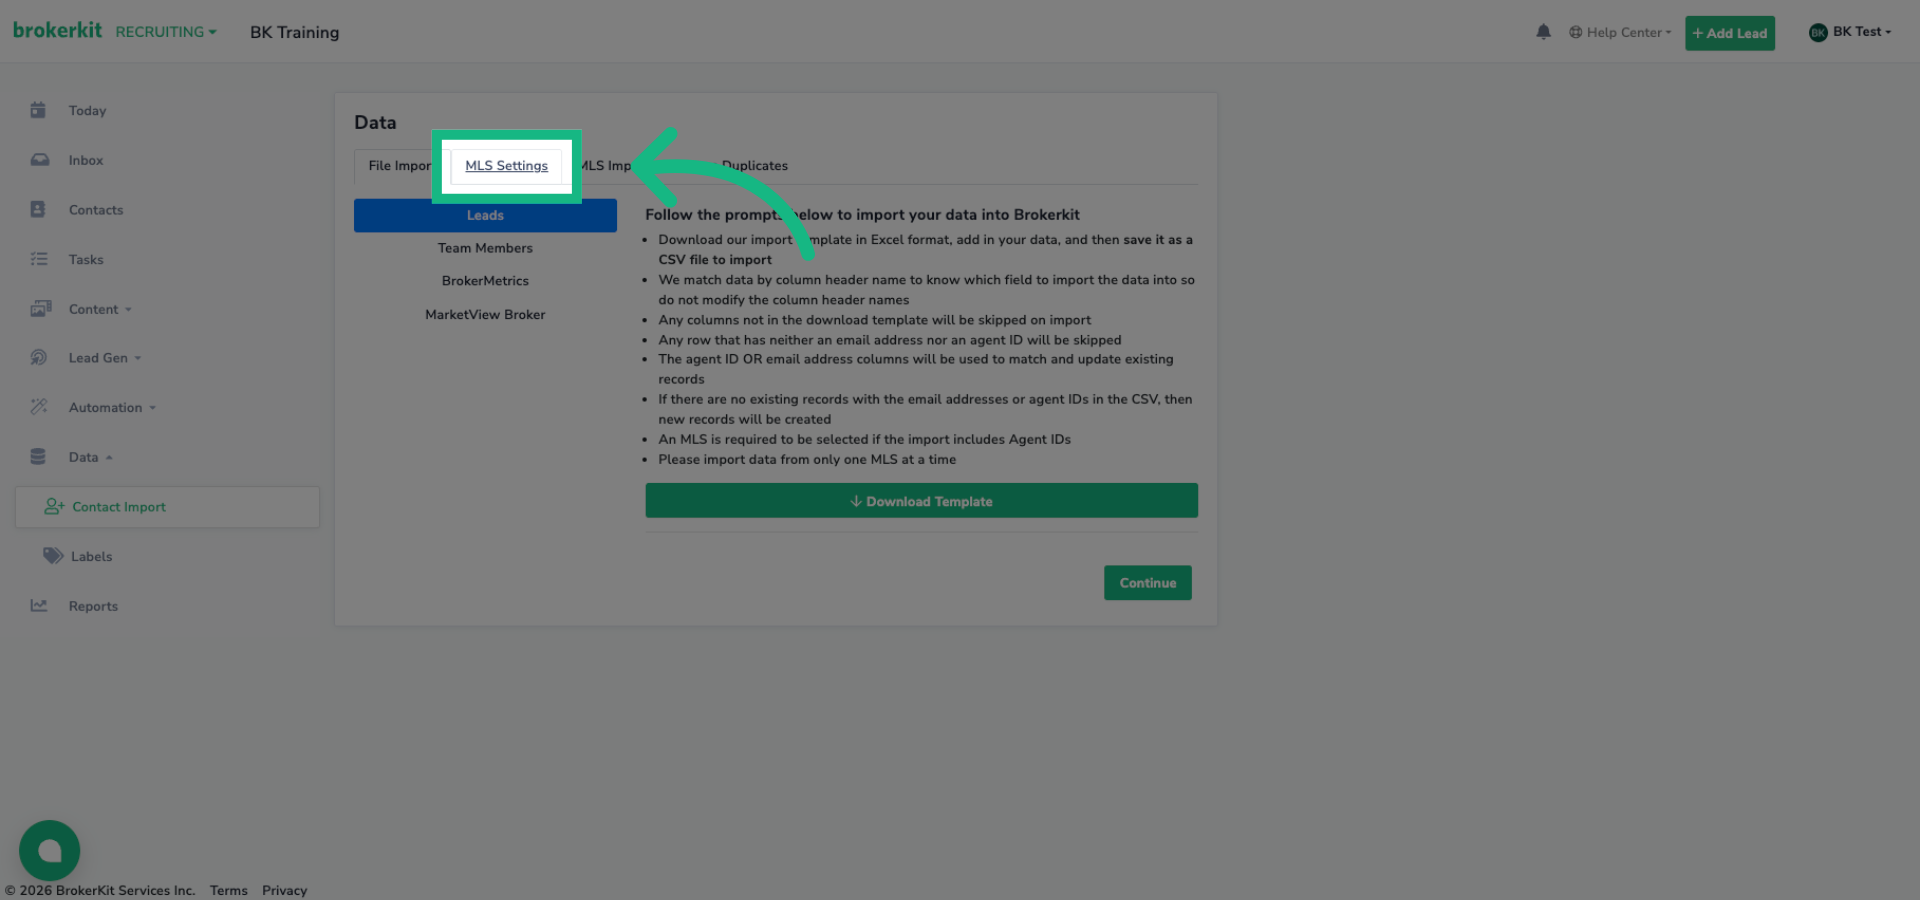
4. Click MLS Settings
Click the MLS Settings tab
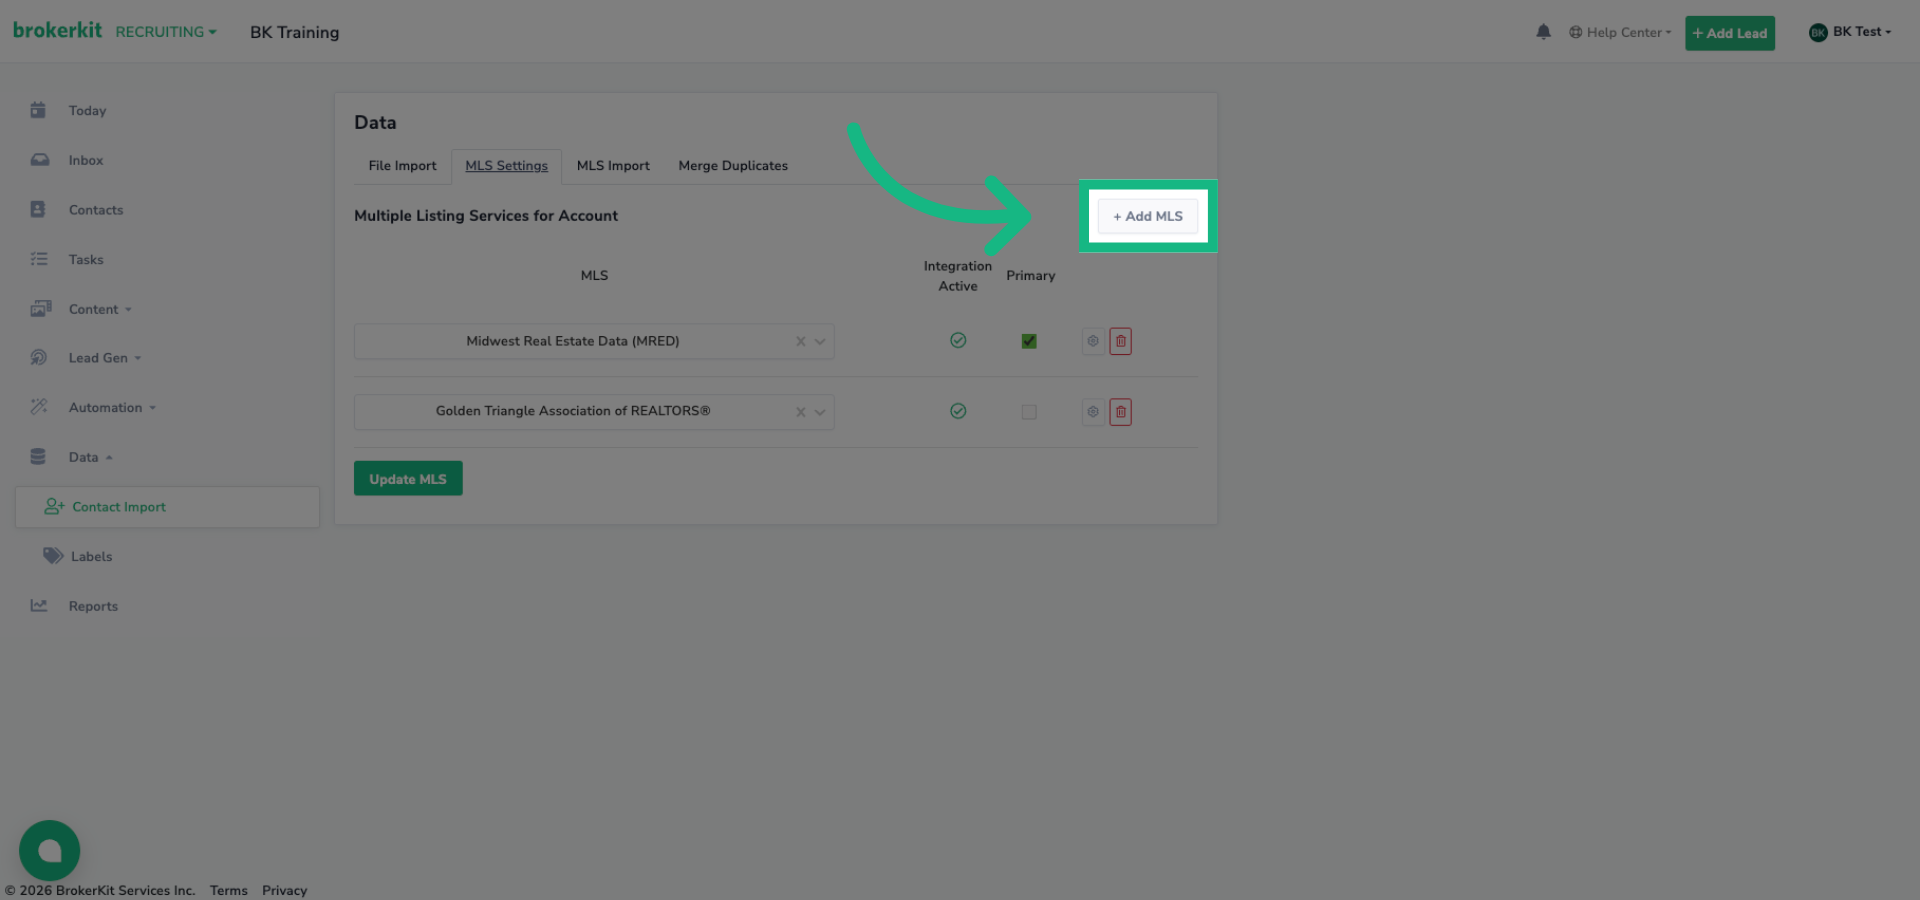
5. Add New MLS
Click Add MLS to start adding new MLSs to your account.
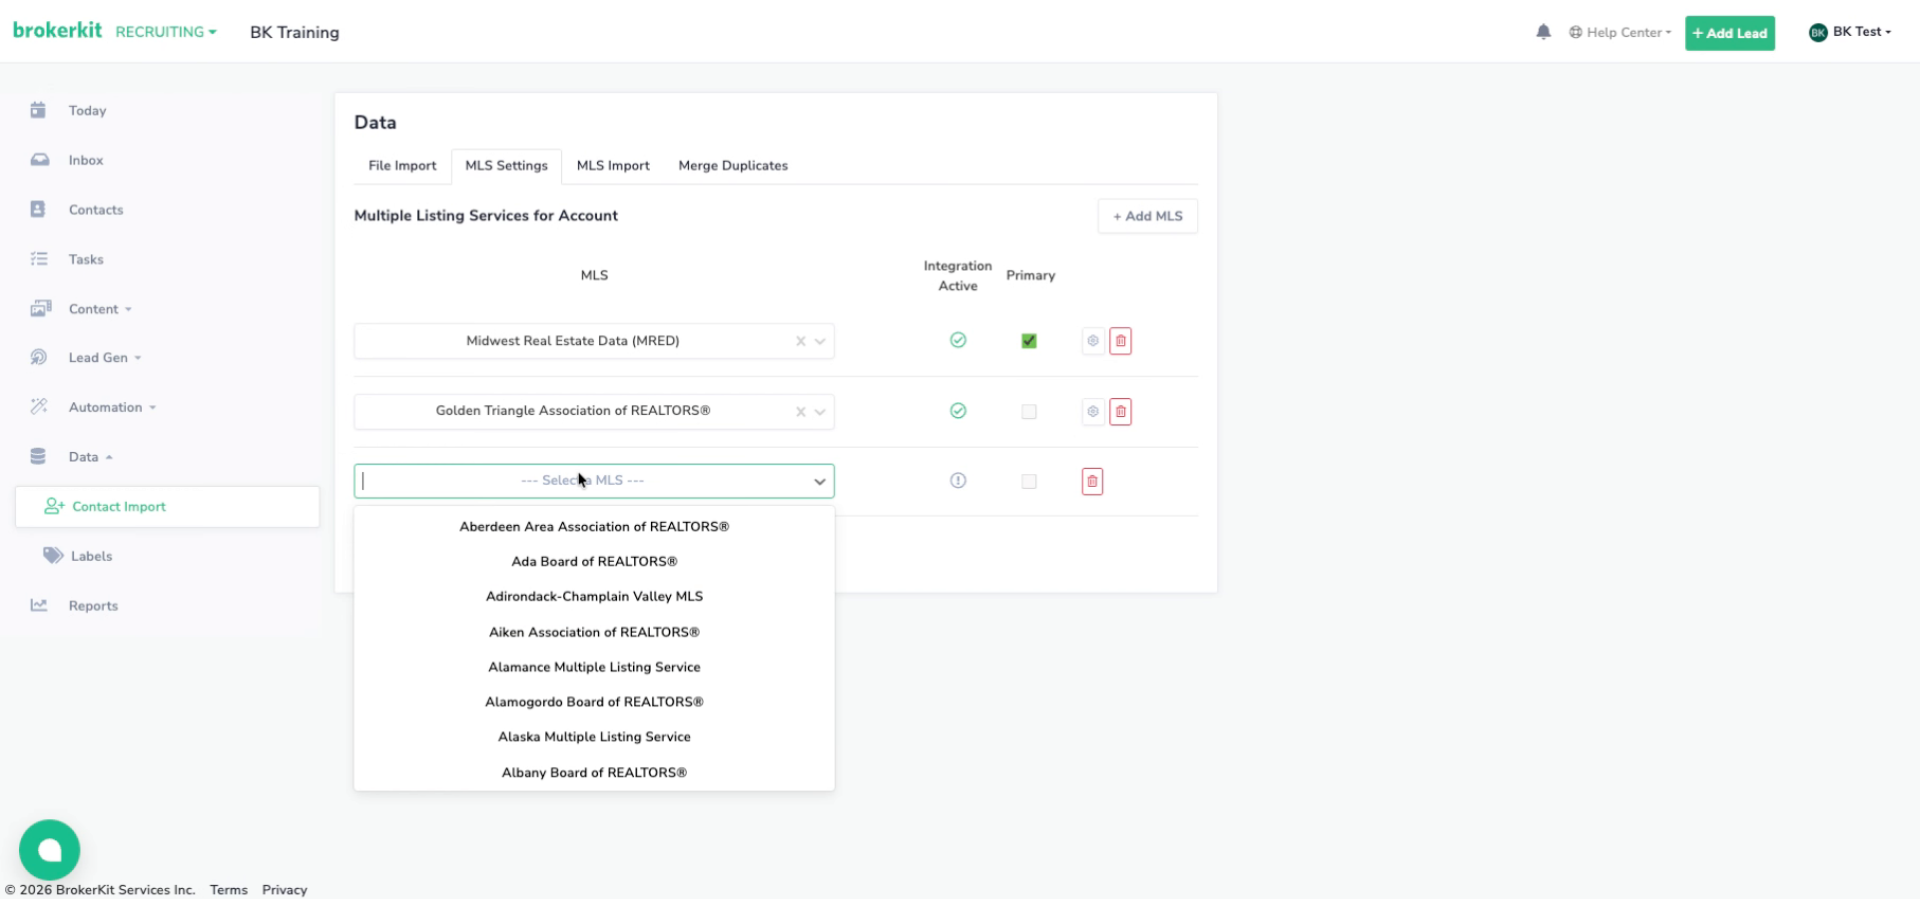
6. Enter MLS Name
Search the name of your MLS and select it from the dropdown menu
7. Update MLS Settings
Click Update MLS to save the new MLS configuration.
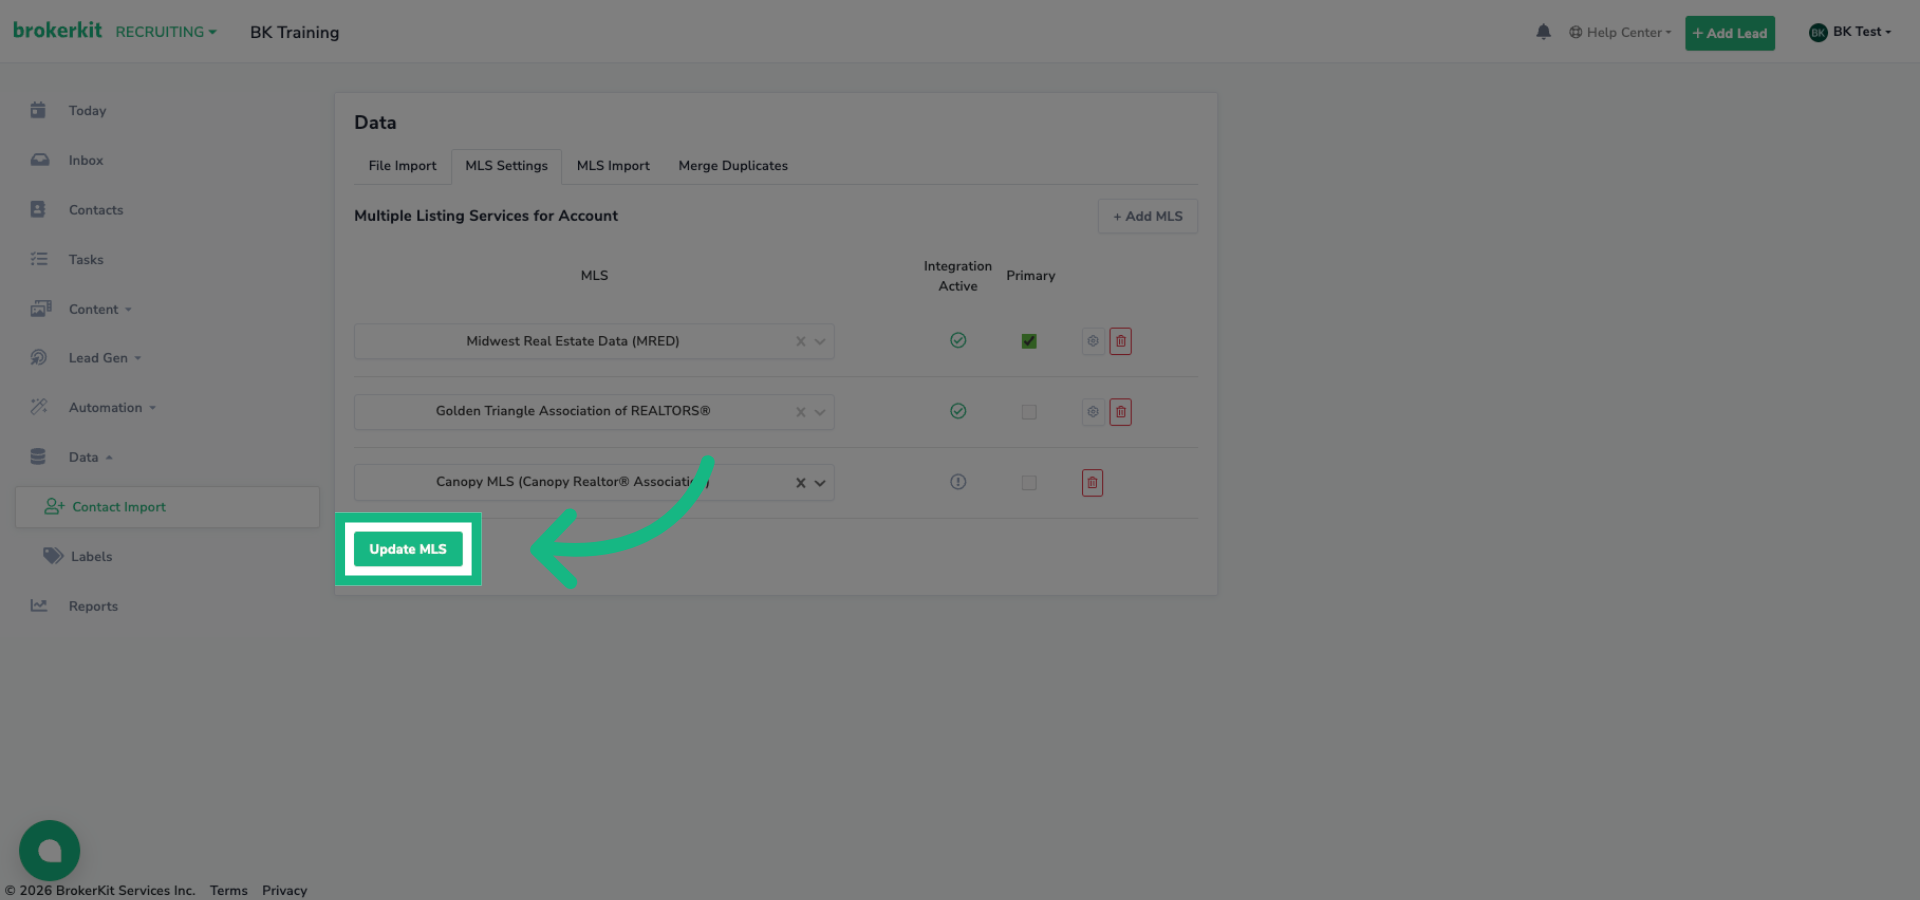
8. Access MLS Configuration
Click to open the detailed configuration for the selected MLS.

9. Manage MLS Data Source
In the MLS Data Source settings
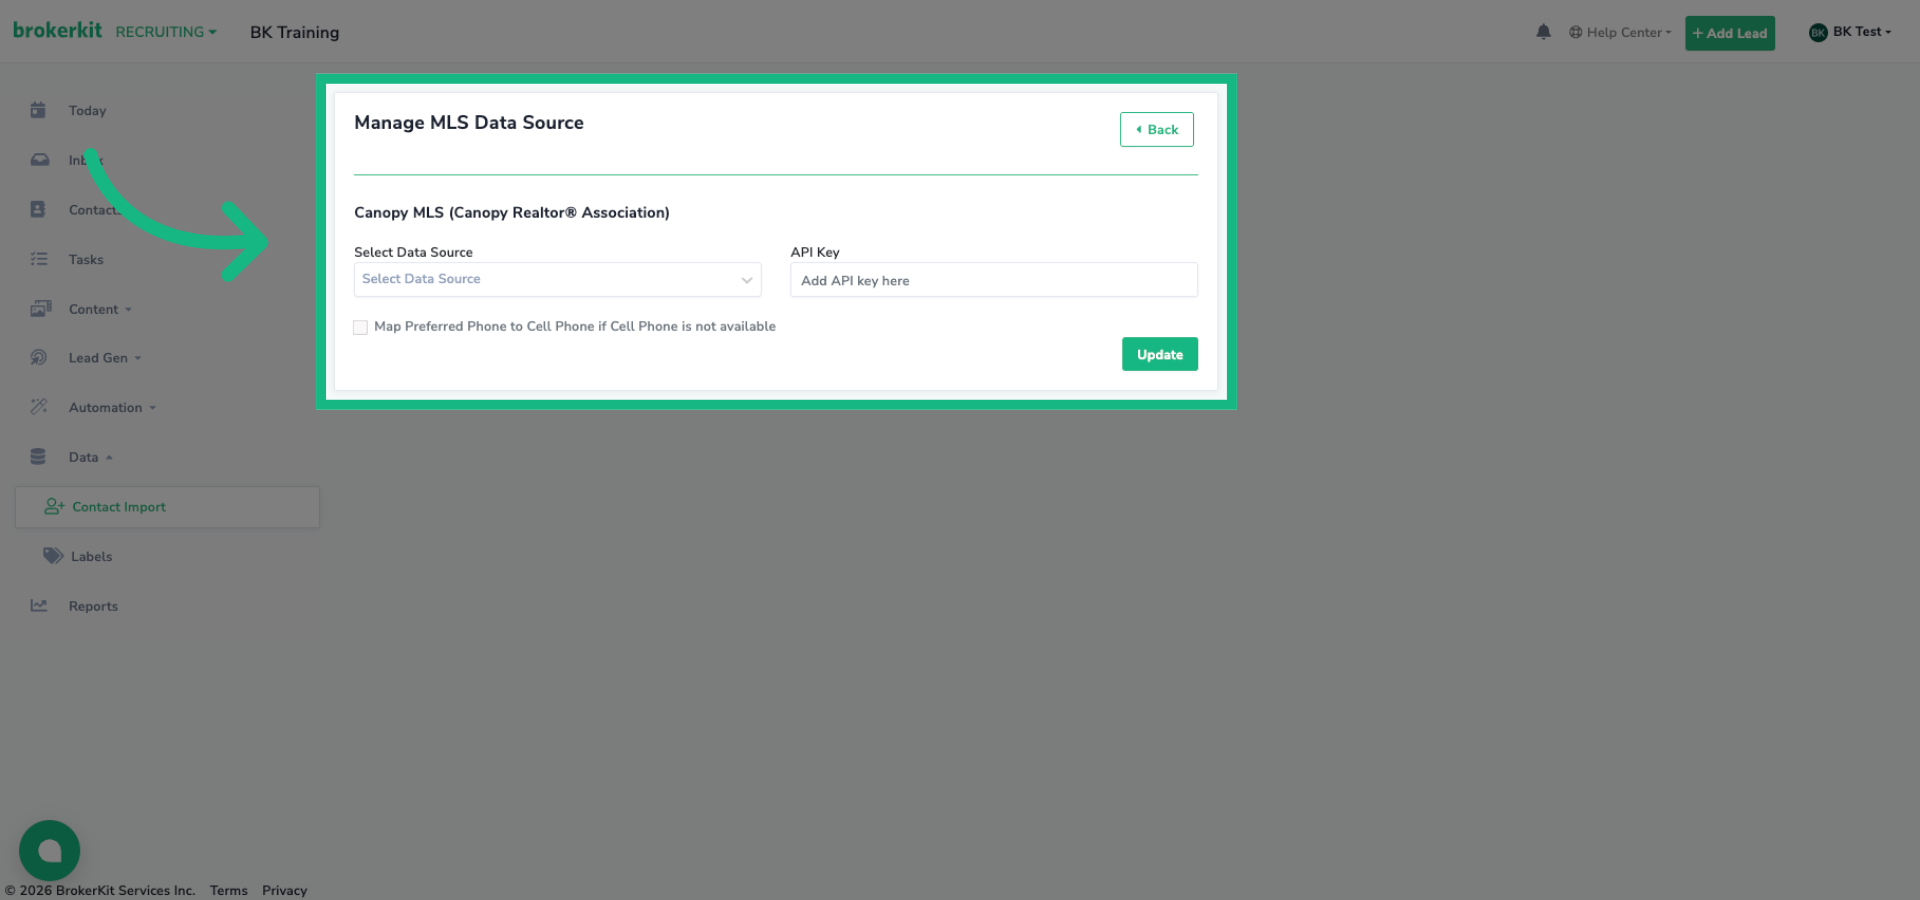
10. Select Courted Option
Click Courted as the selected Data Source

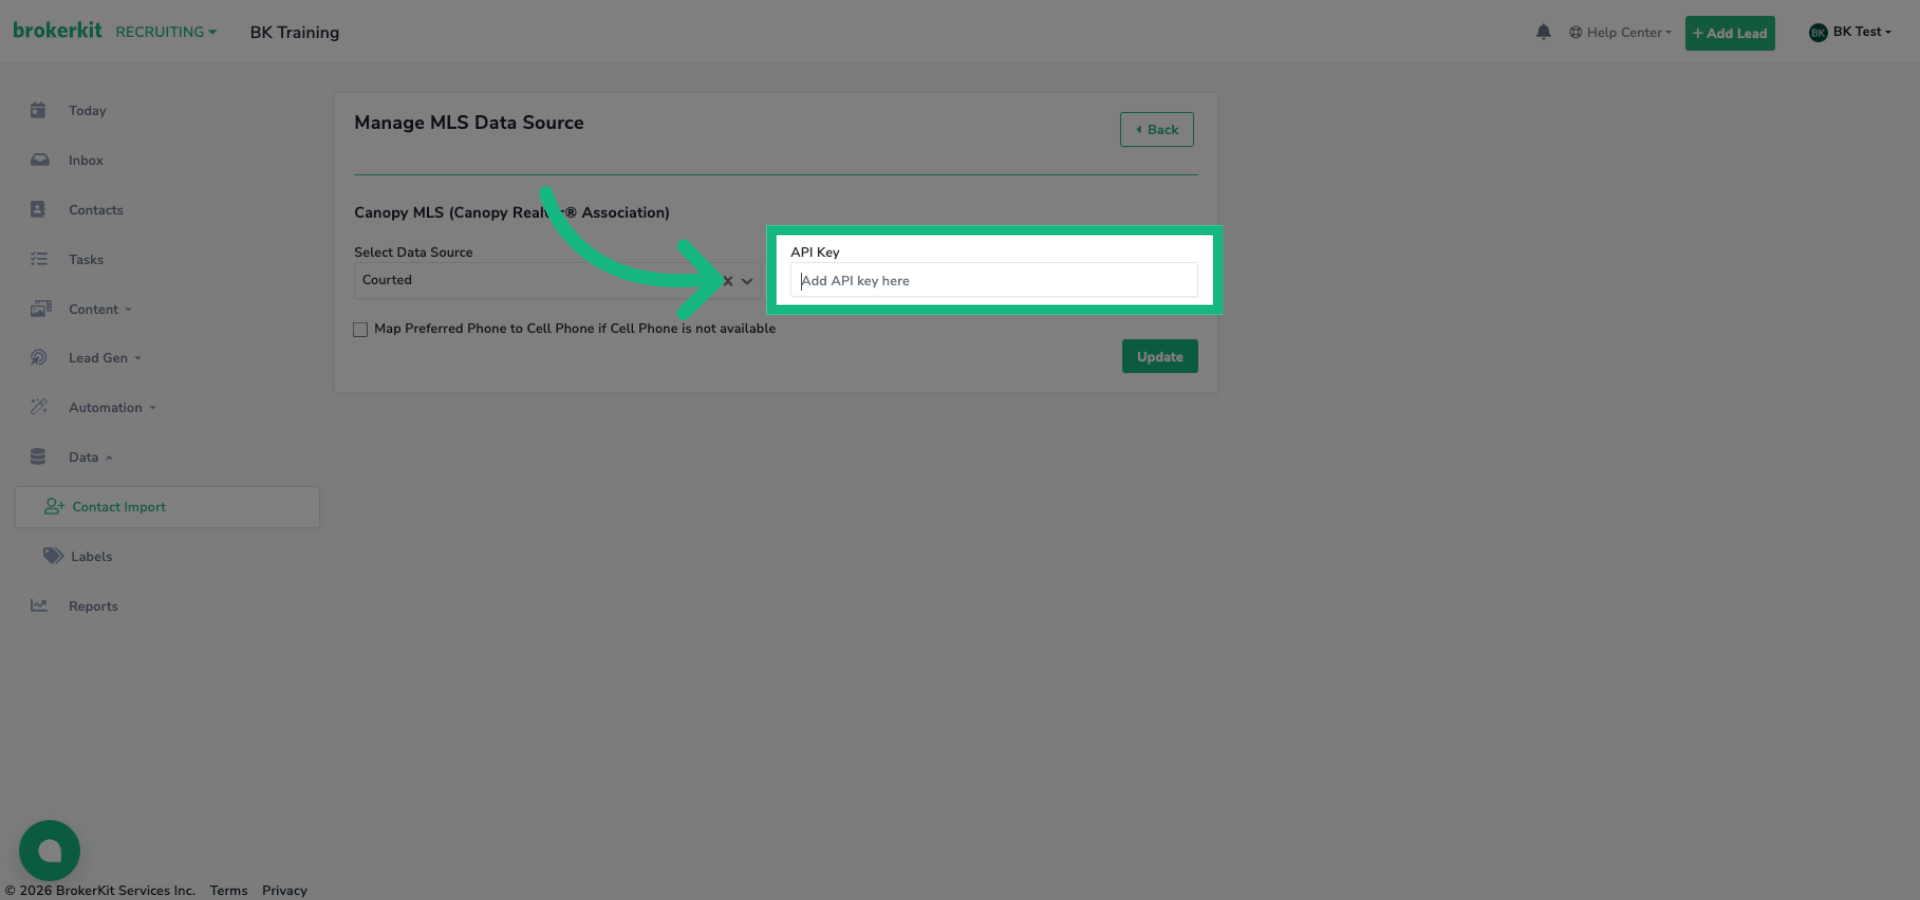
11. Open API Key Field
Enter your Courted API key
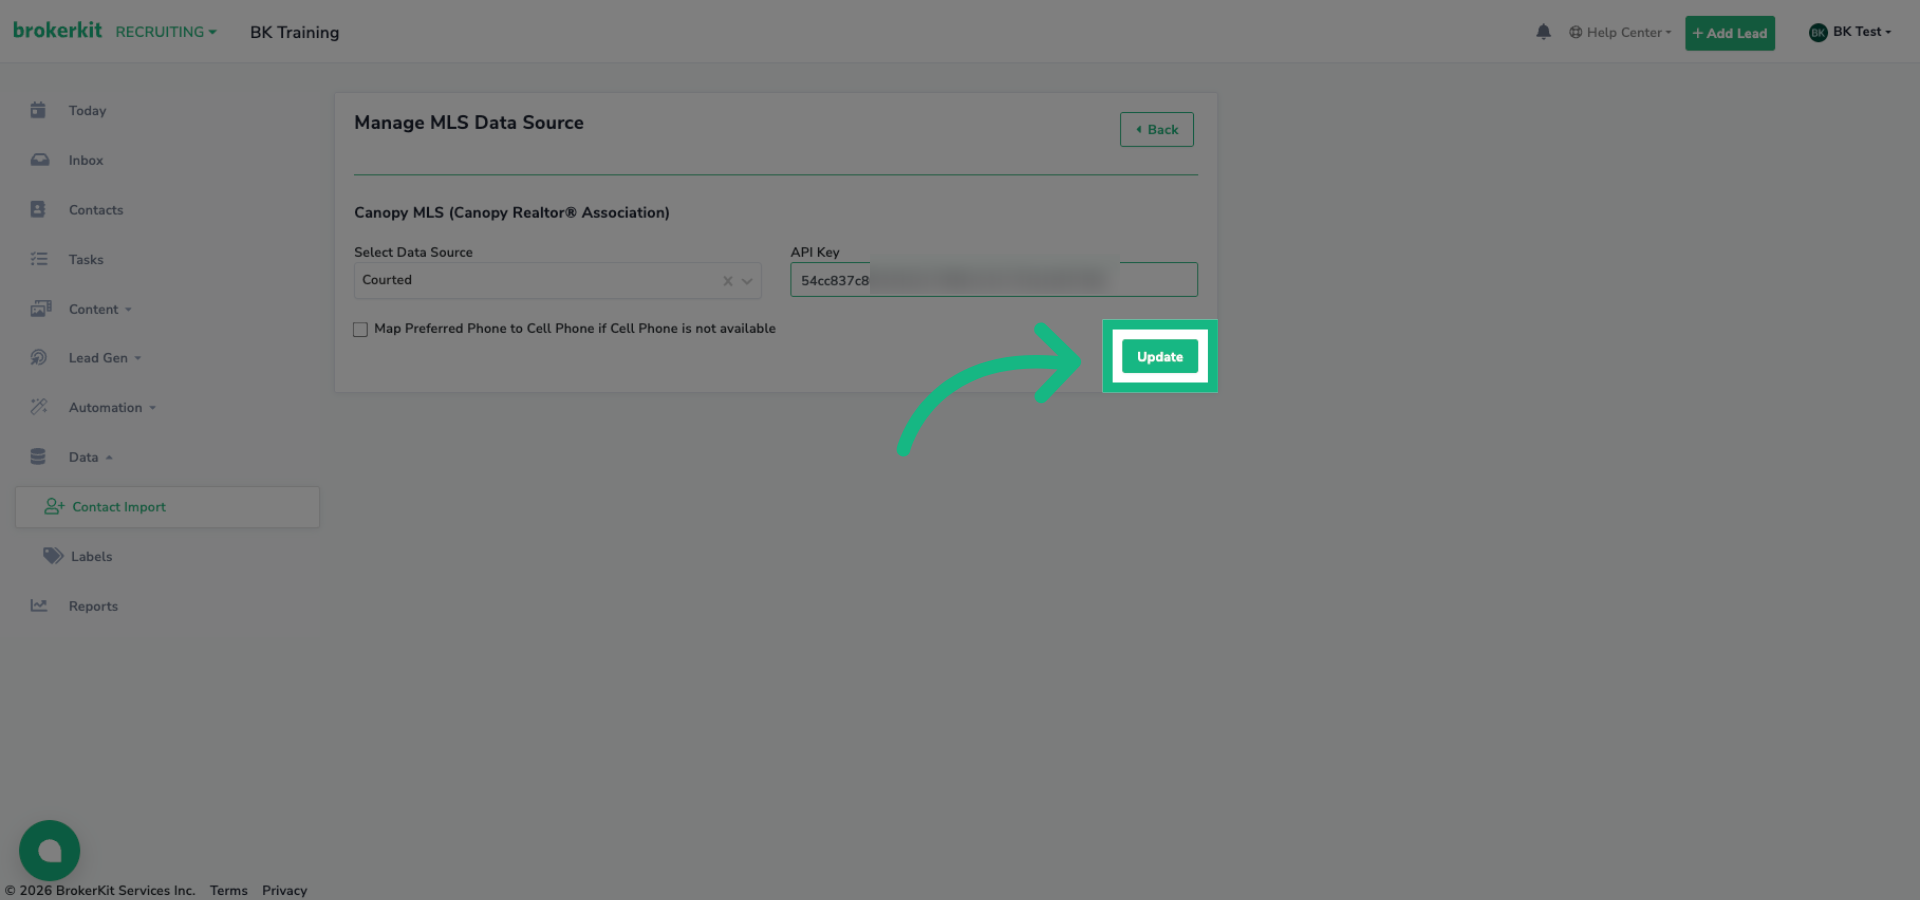
12. Save API Key
Click Update to save the API key and enable the integration.
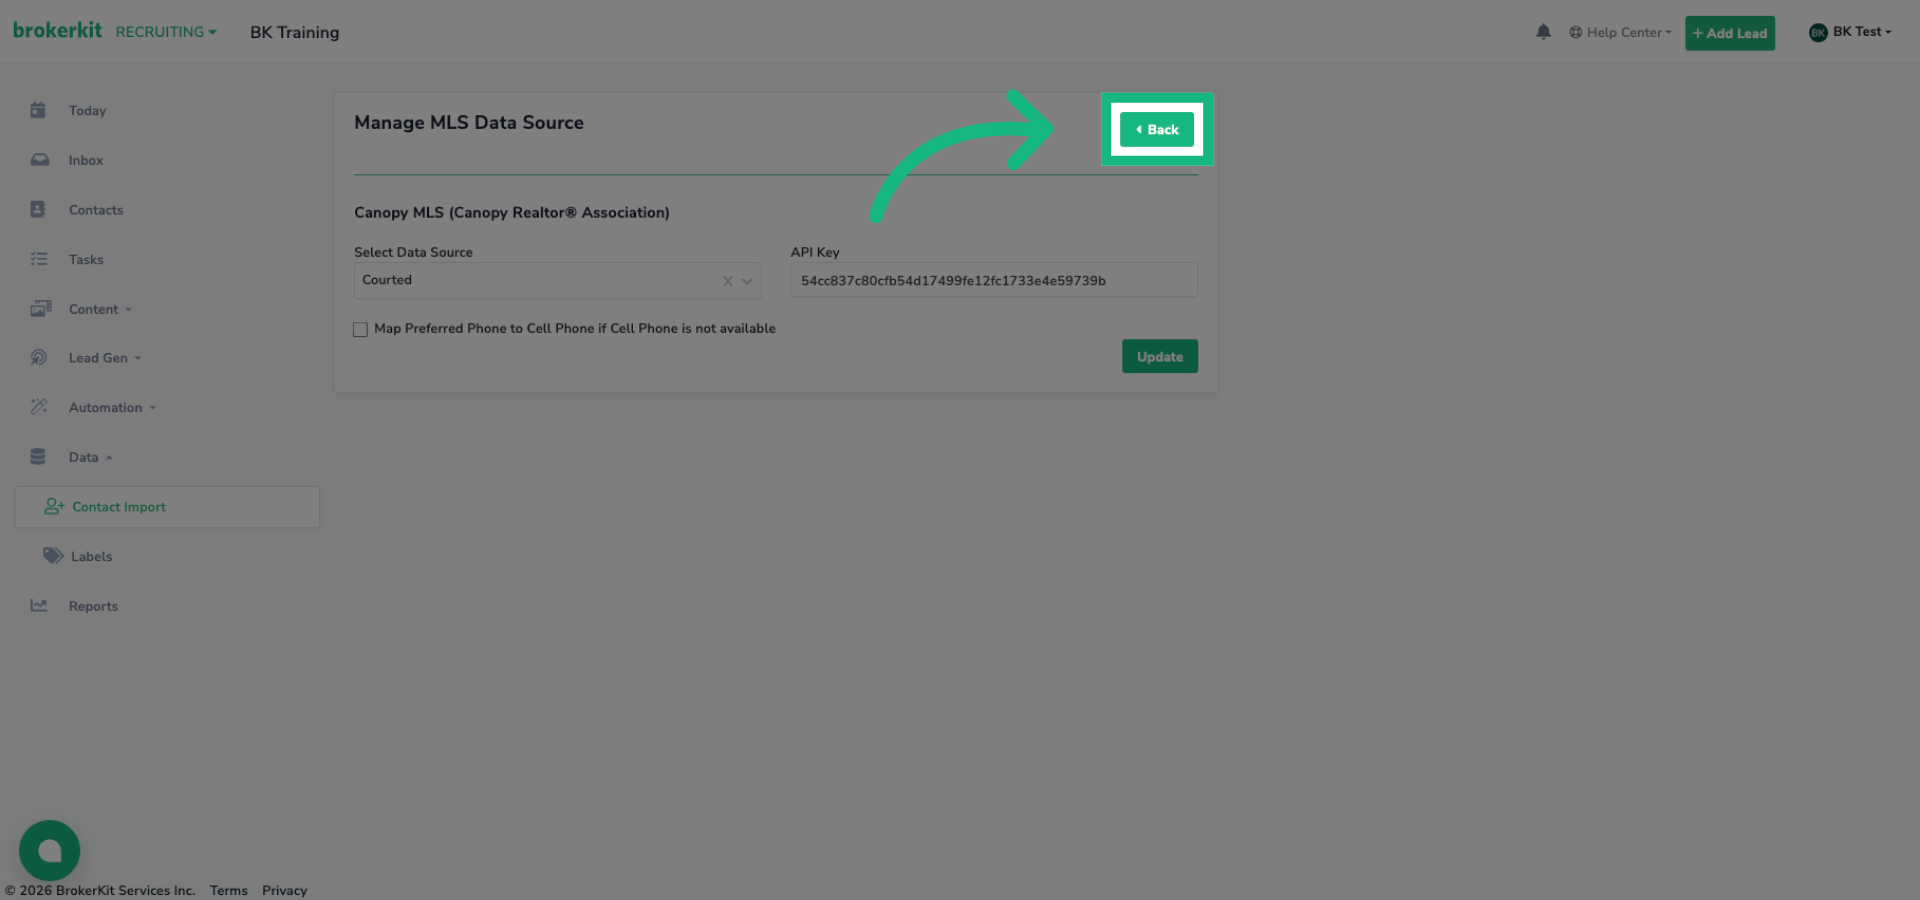
13. Return to Data Menu
Click Back to return to the MLS Settings main menu
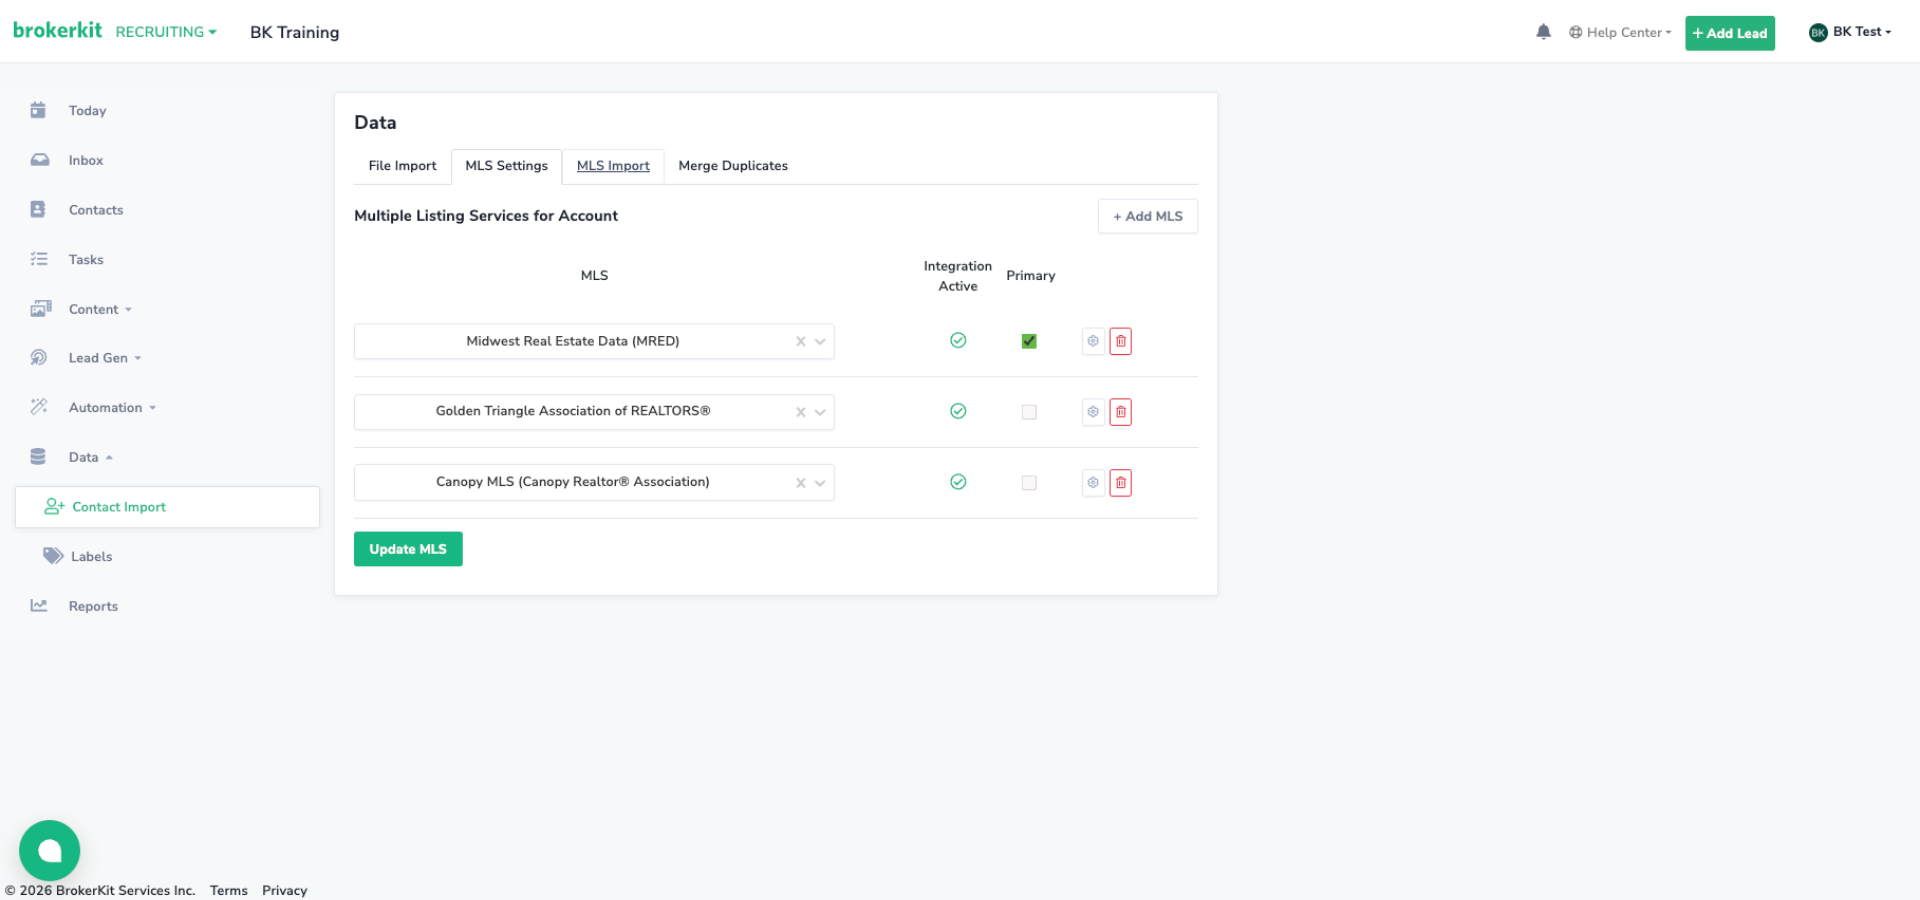
14. MLS List
Access the list of MLS services associated with your account.
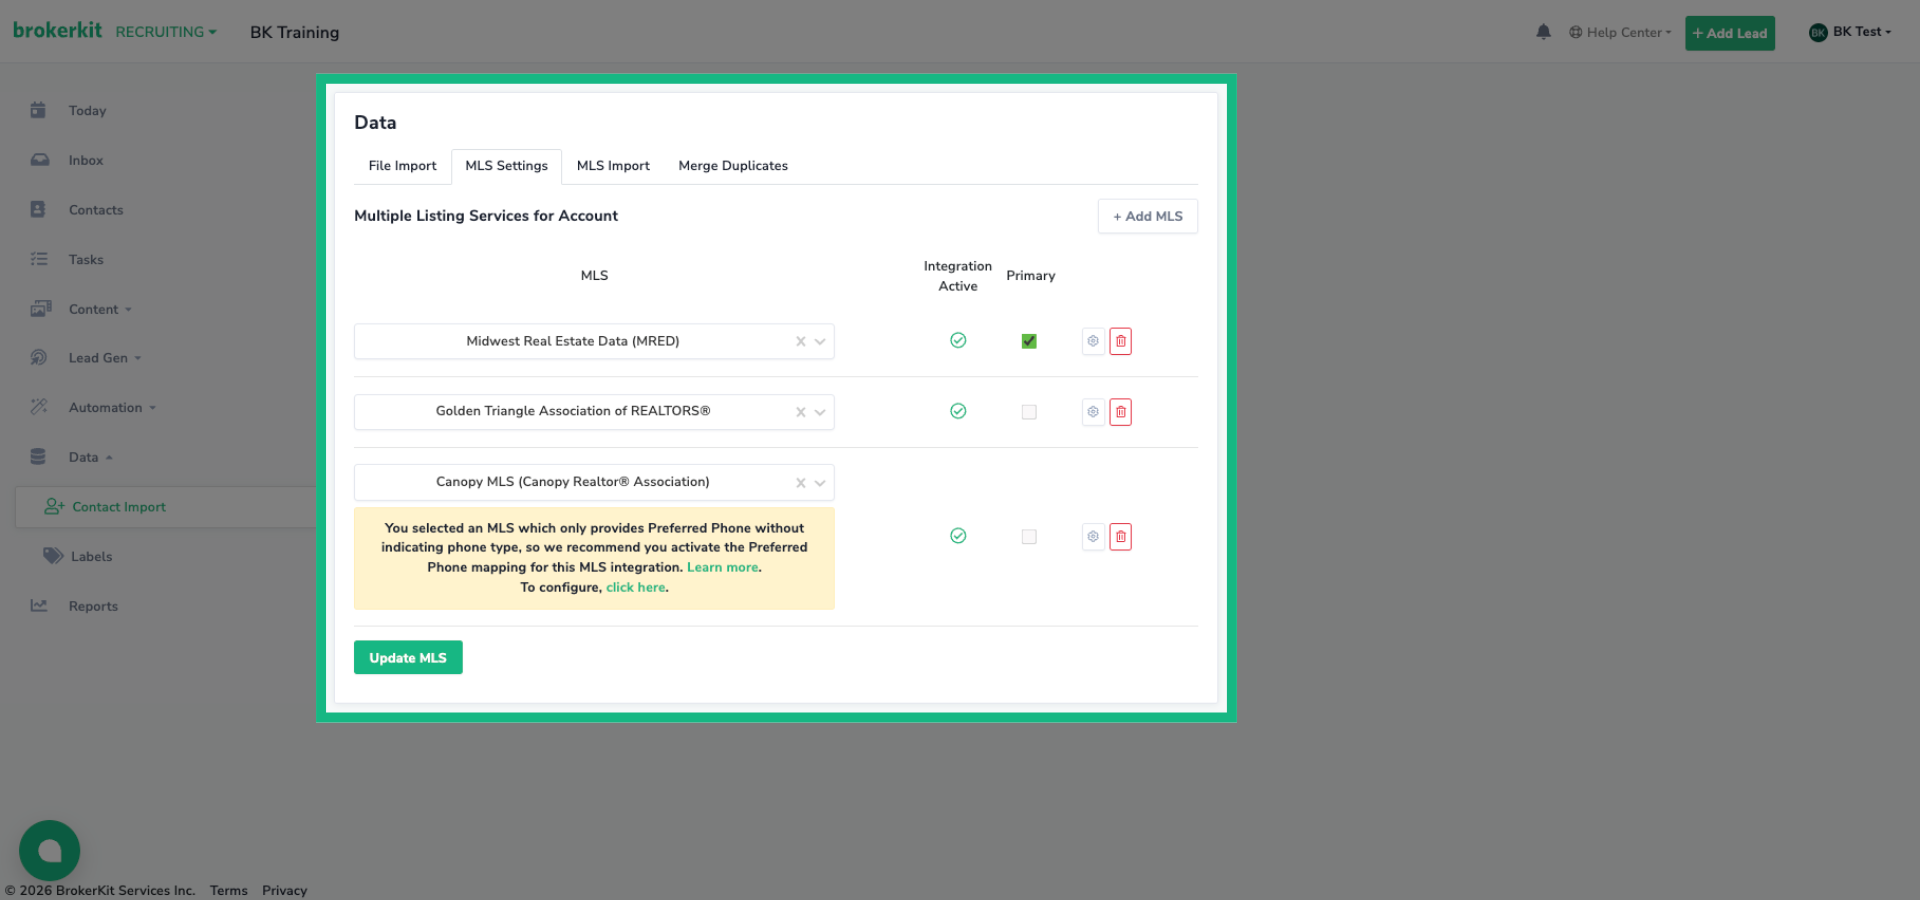
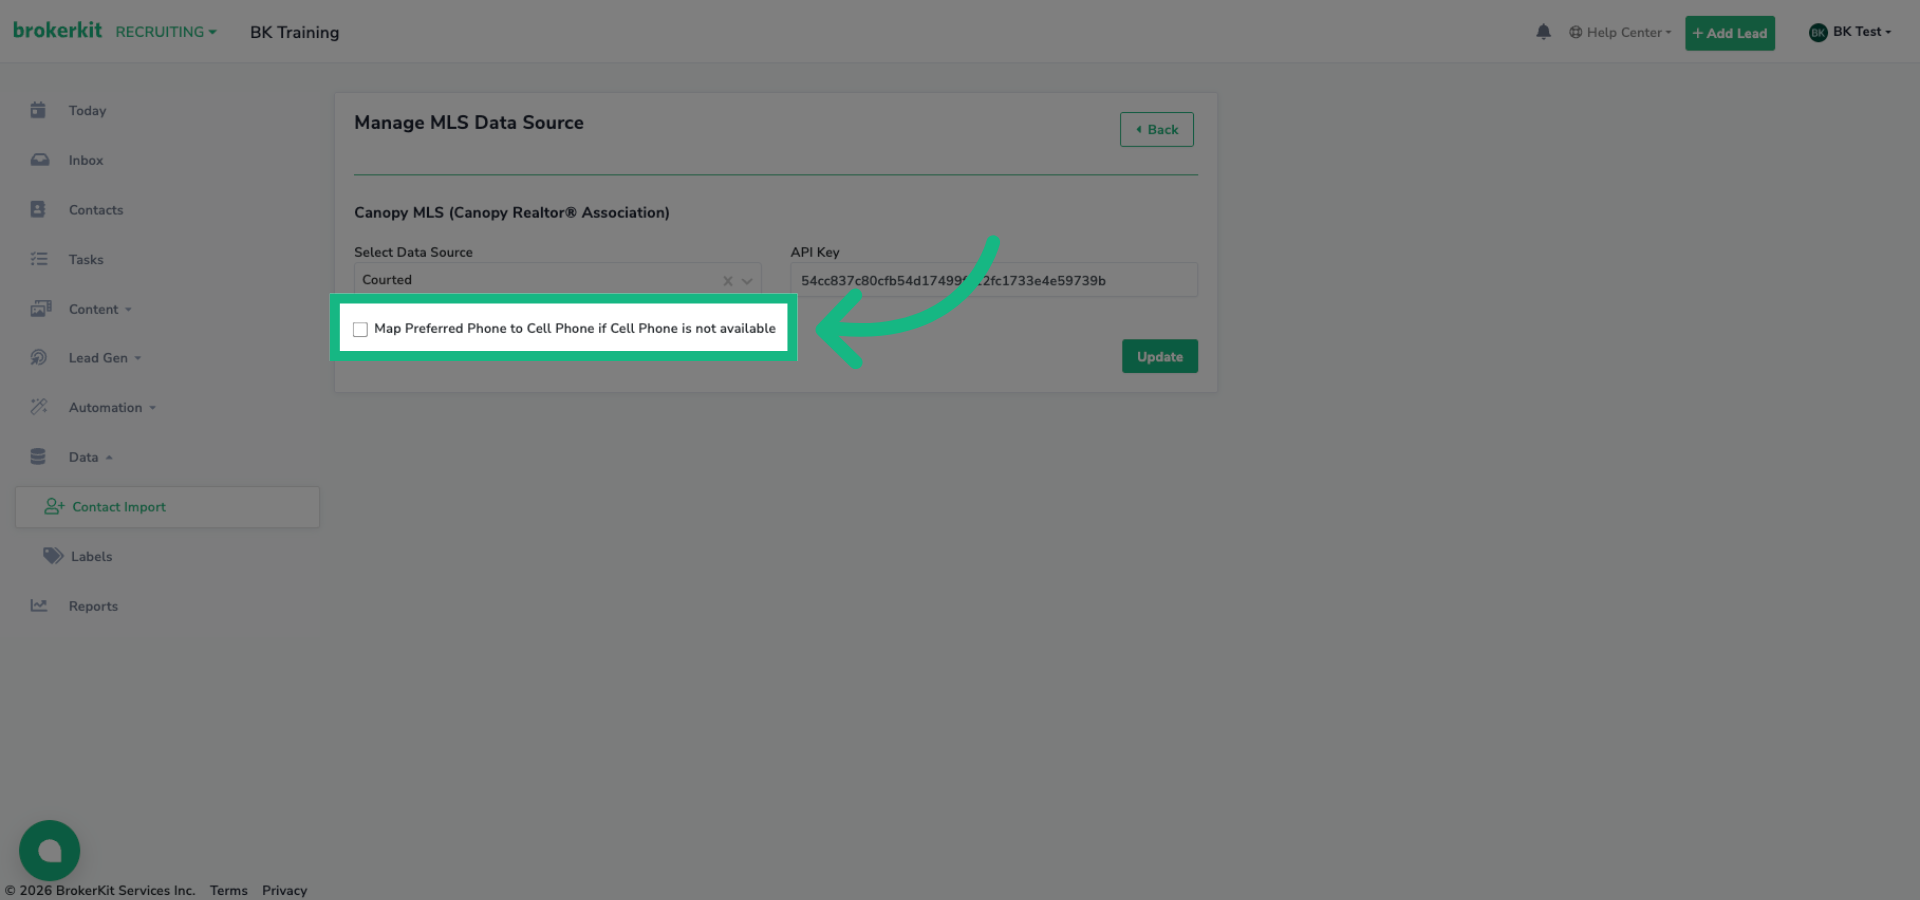
15. Review Phone Mapping Recommendation
Note the recommendation to activate Preferred Phone mapping for this specific MLS integration.
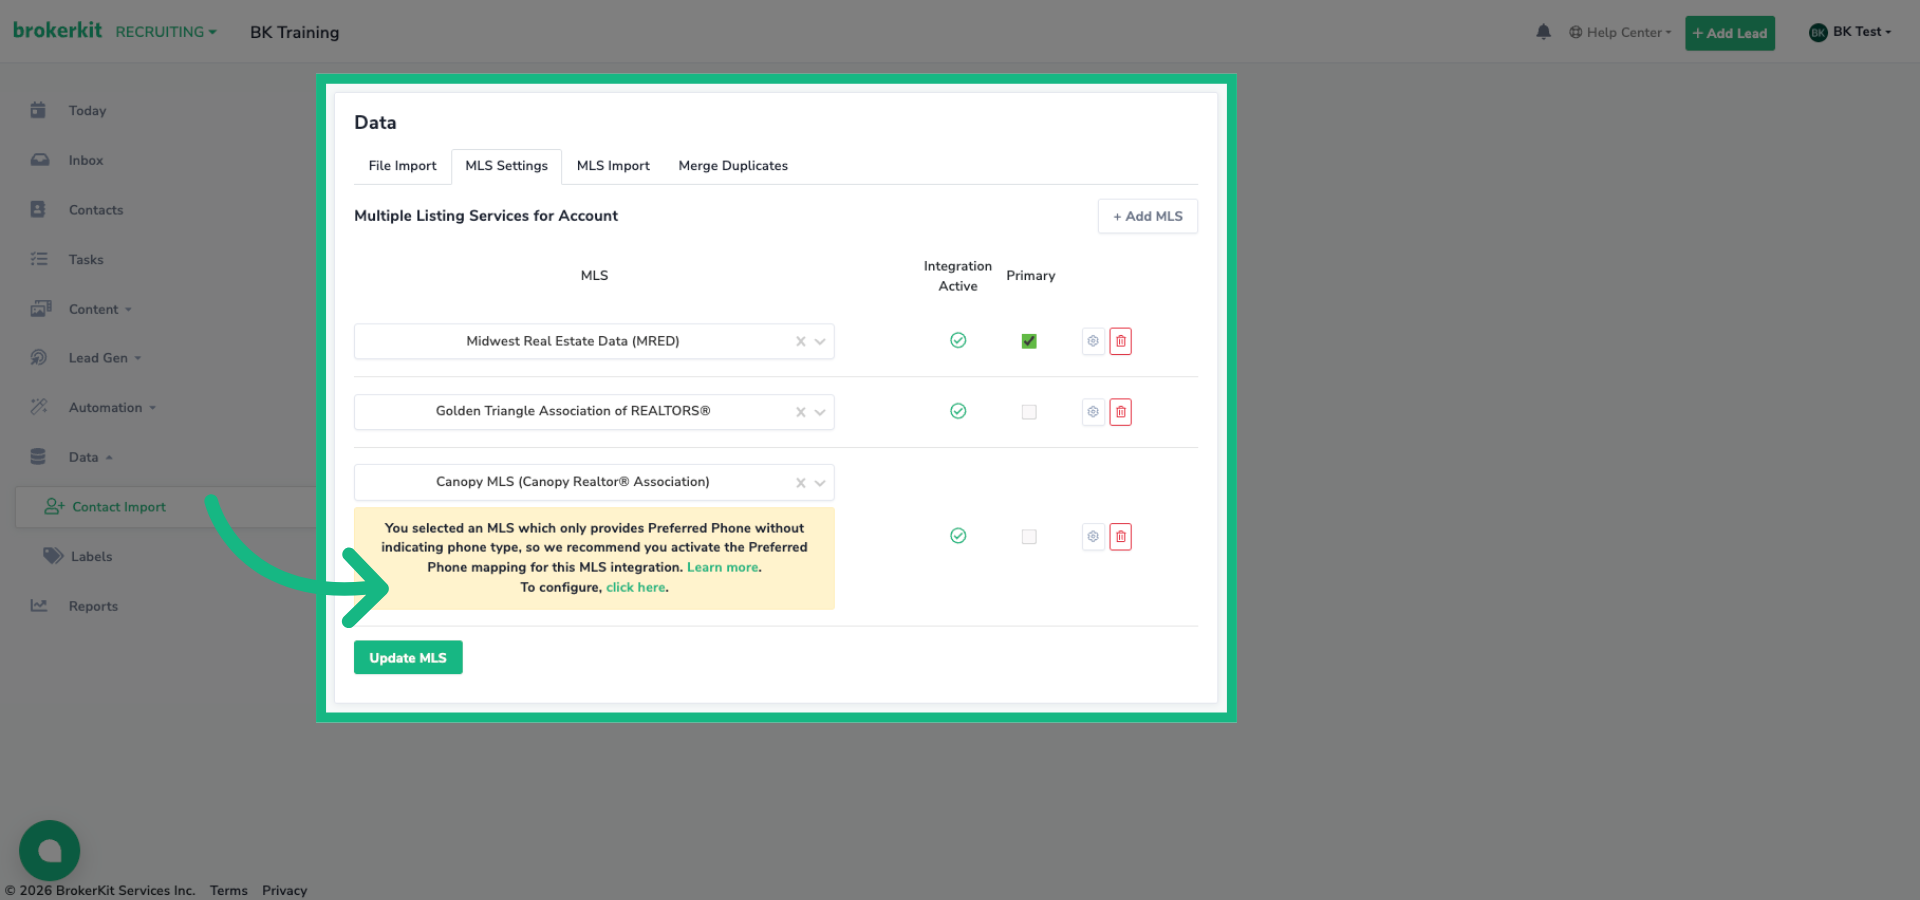
16. Access Phone Mapping Settings
Click the gear to turn on Preferred Phone setting
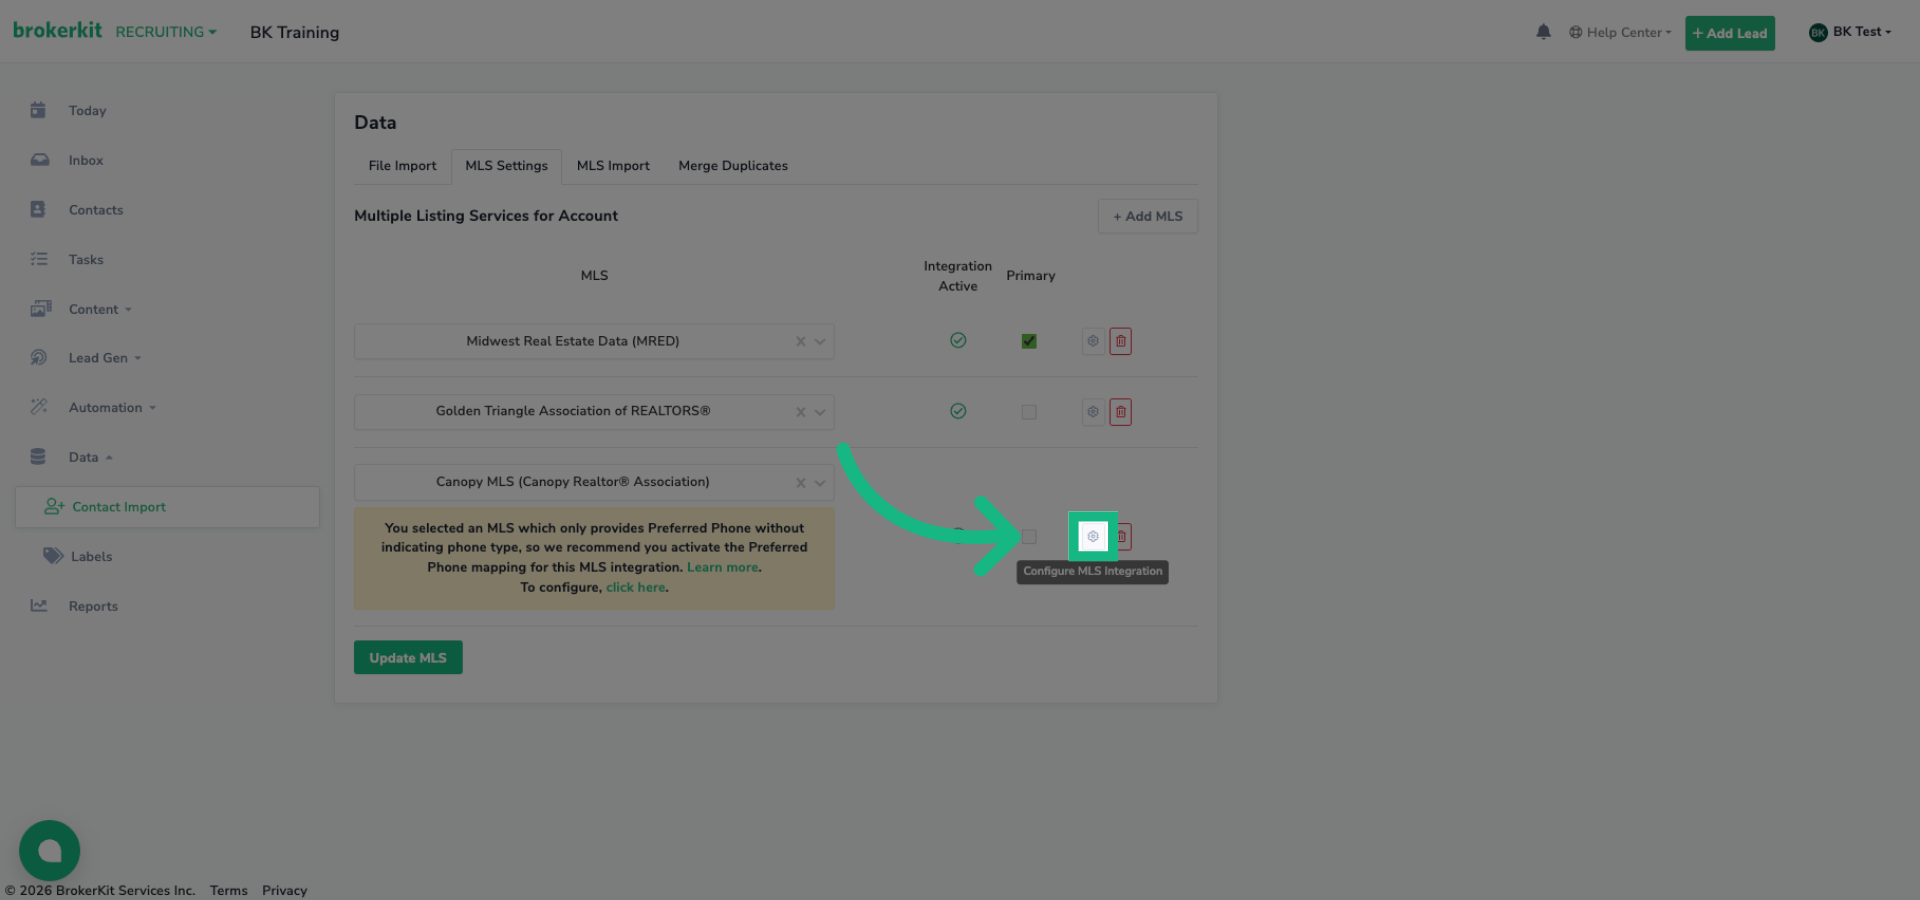
17. Enable Phone Mapping Option
Some MLSs don't provide cell phone numbers, they only have a preferred phone field. When you enable this option, Brokerkit automatically maps the preferred phone to the cell phone field for contacts from those MLSs. This applies to about 13 MLSs that are configured this way.
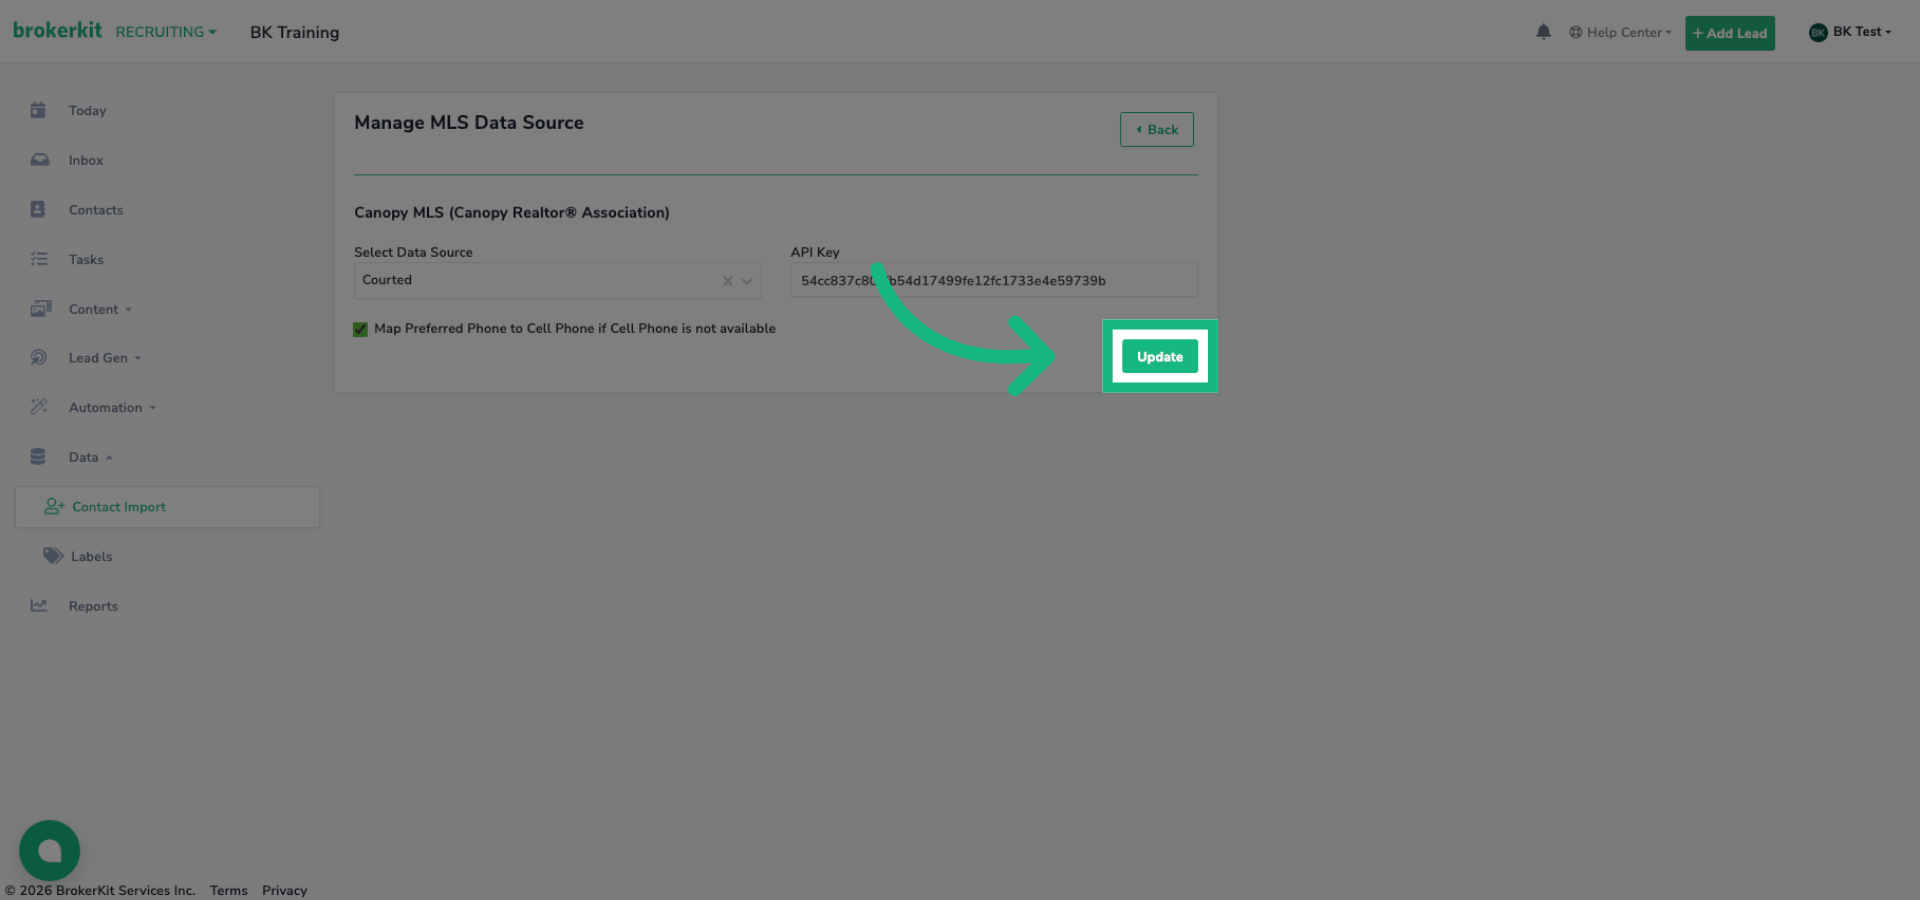
18. Save Phone Mapping Changes
Click Update to save the changes to phone mapping settings.
19. Creating Your First Courted Import Query
Now lets create your first Courted Import Query
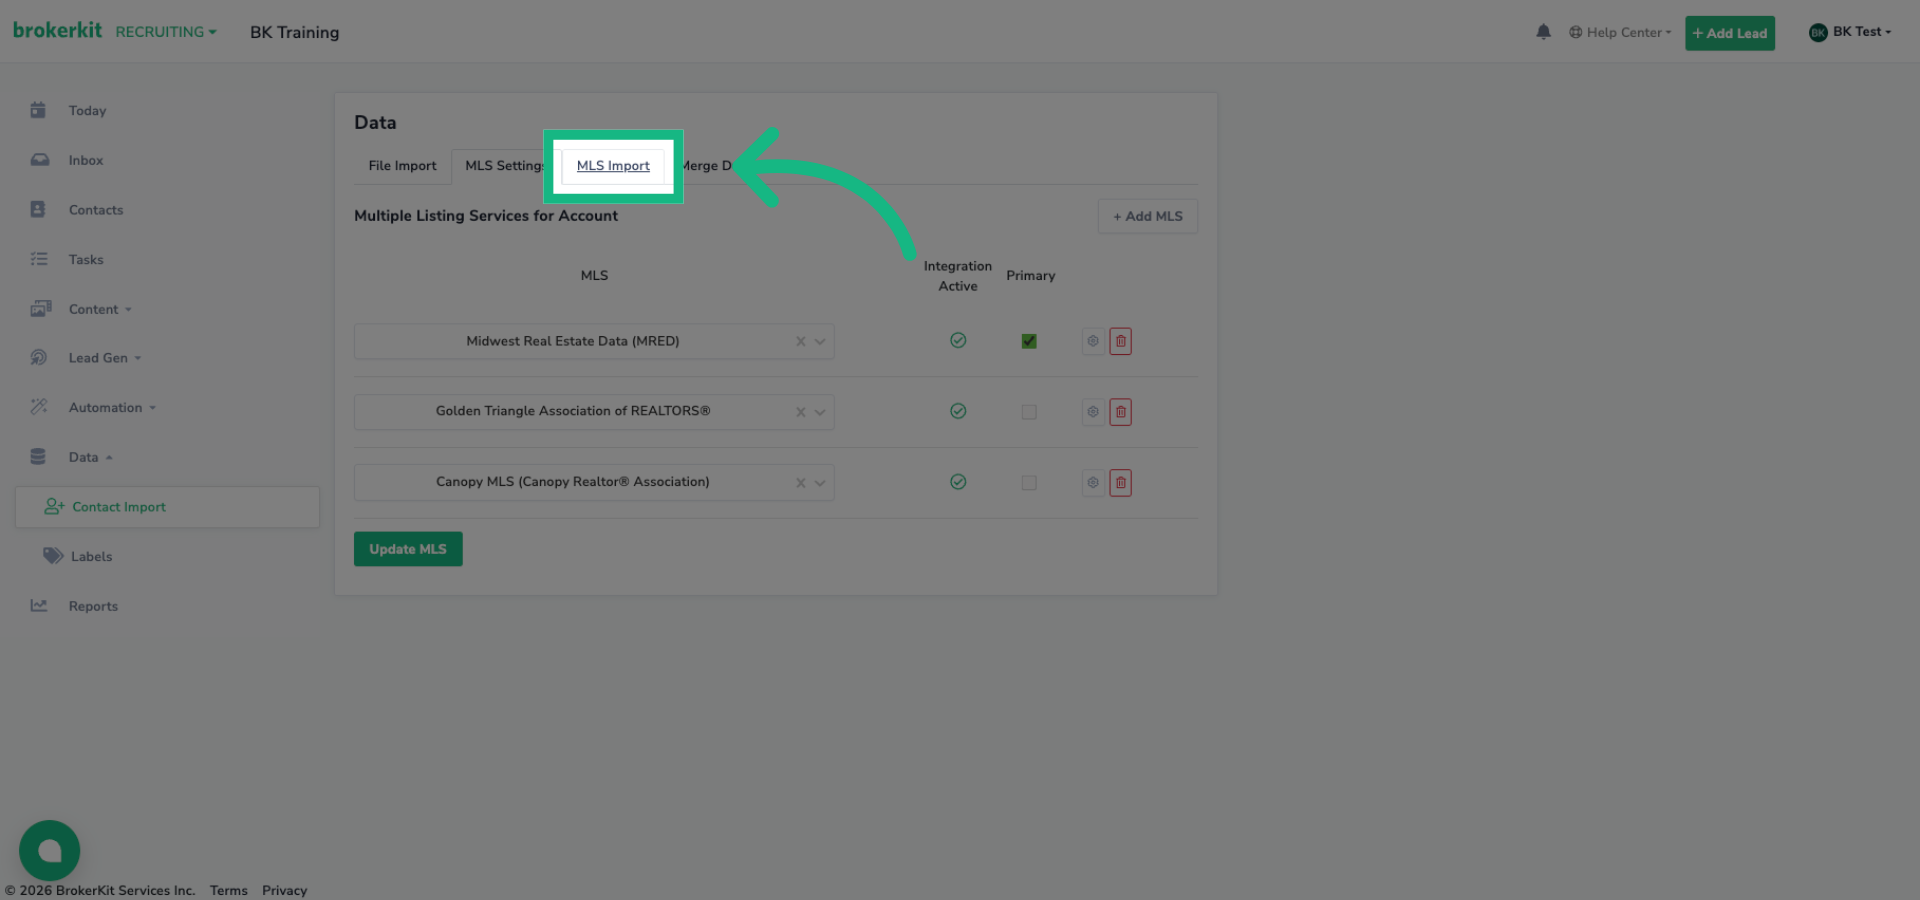
20. MLS Import Tab
Click the MLS Import Tab
21. Choose Courted Provider
Click the Add Import Query button and select Courted

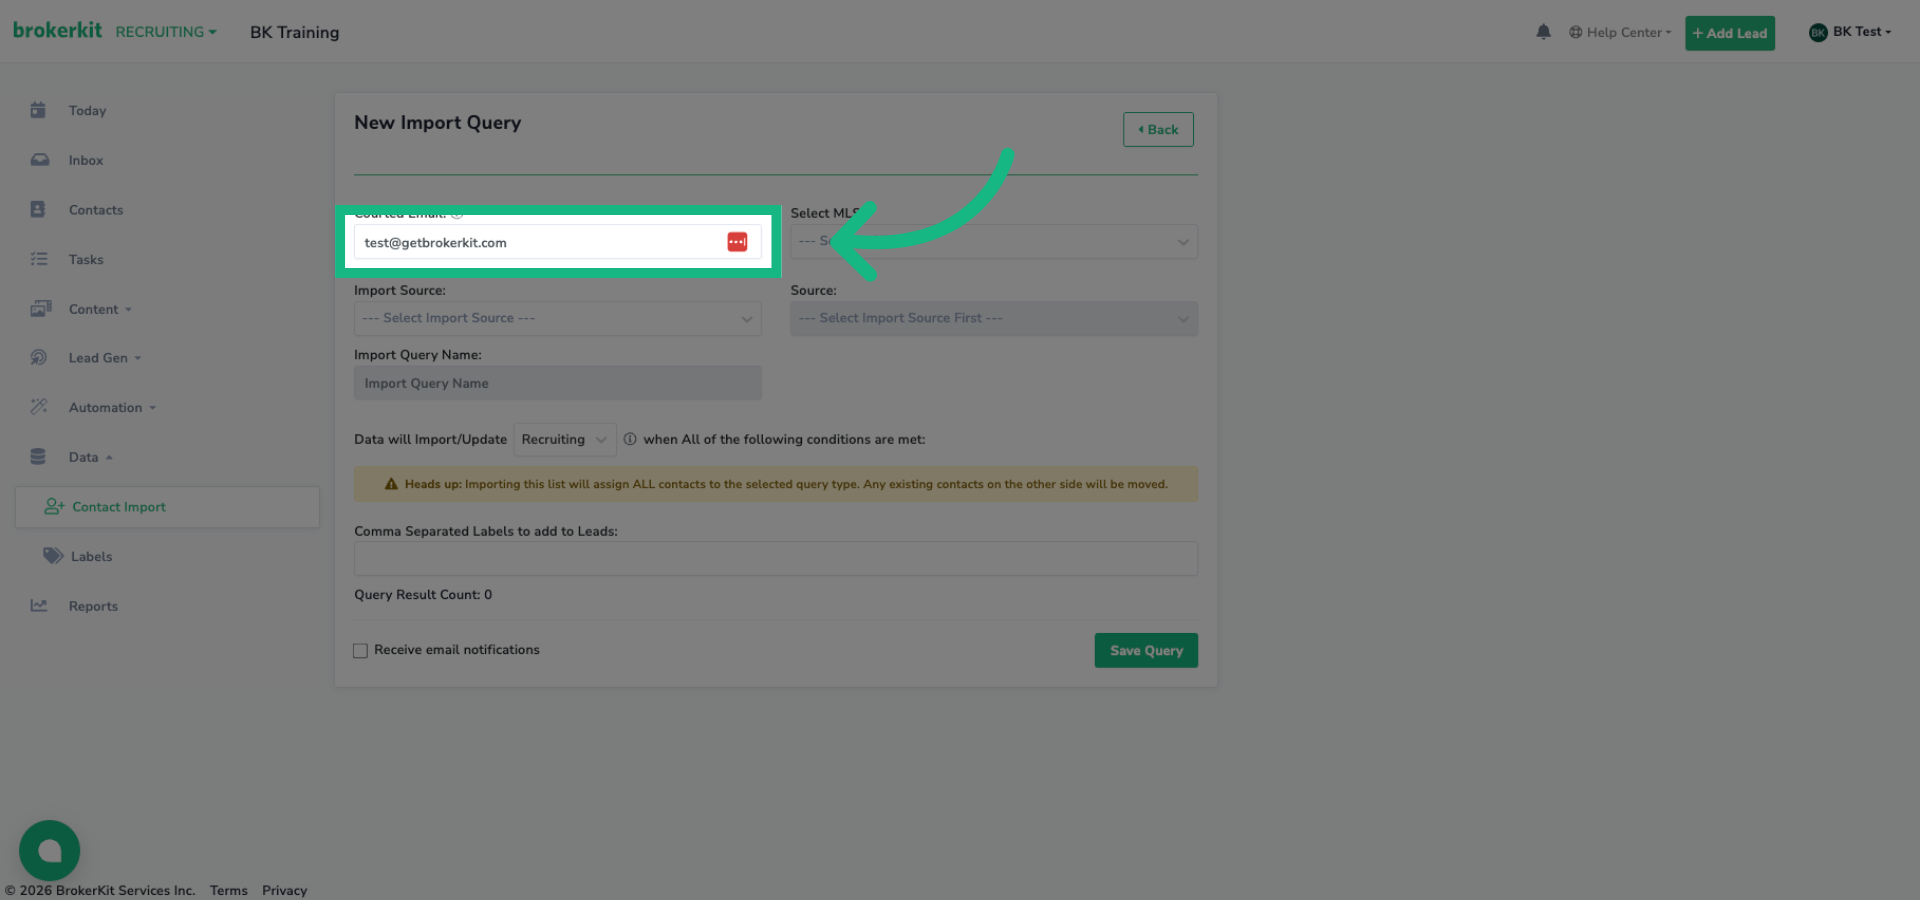
22. Access Courted Email Field
First is the Courted Email field. This automatically populates with your Brokerkit account email. If your Courted account uses a different email address, update it here. This email must match a Courted account that has access to the watchlists or saved searches you want to import.
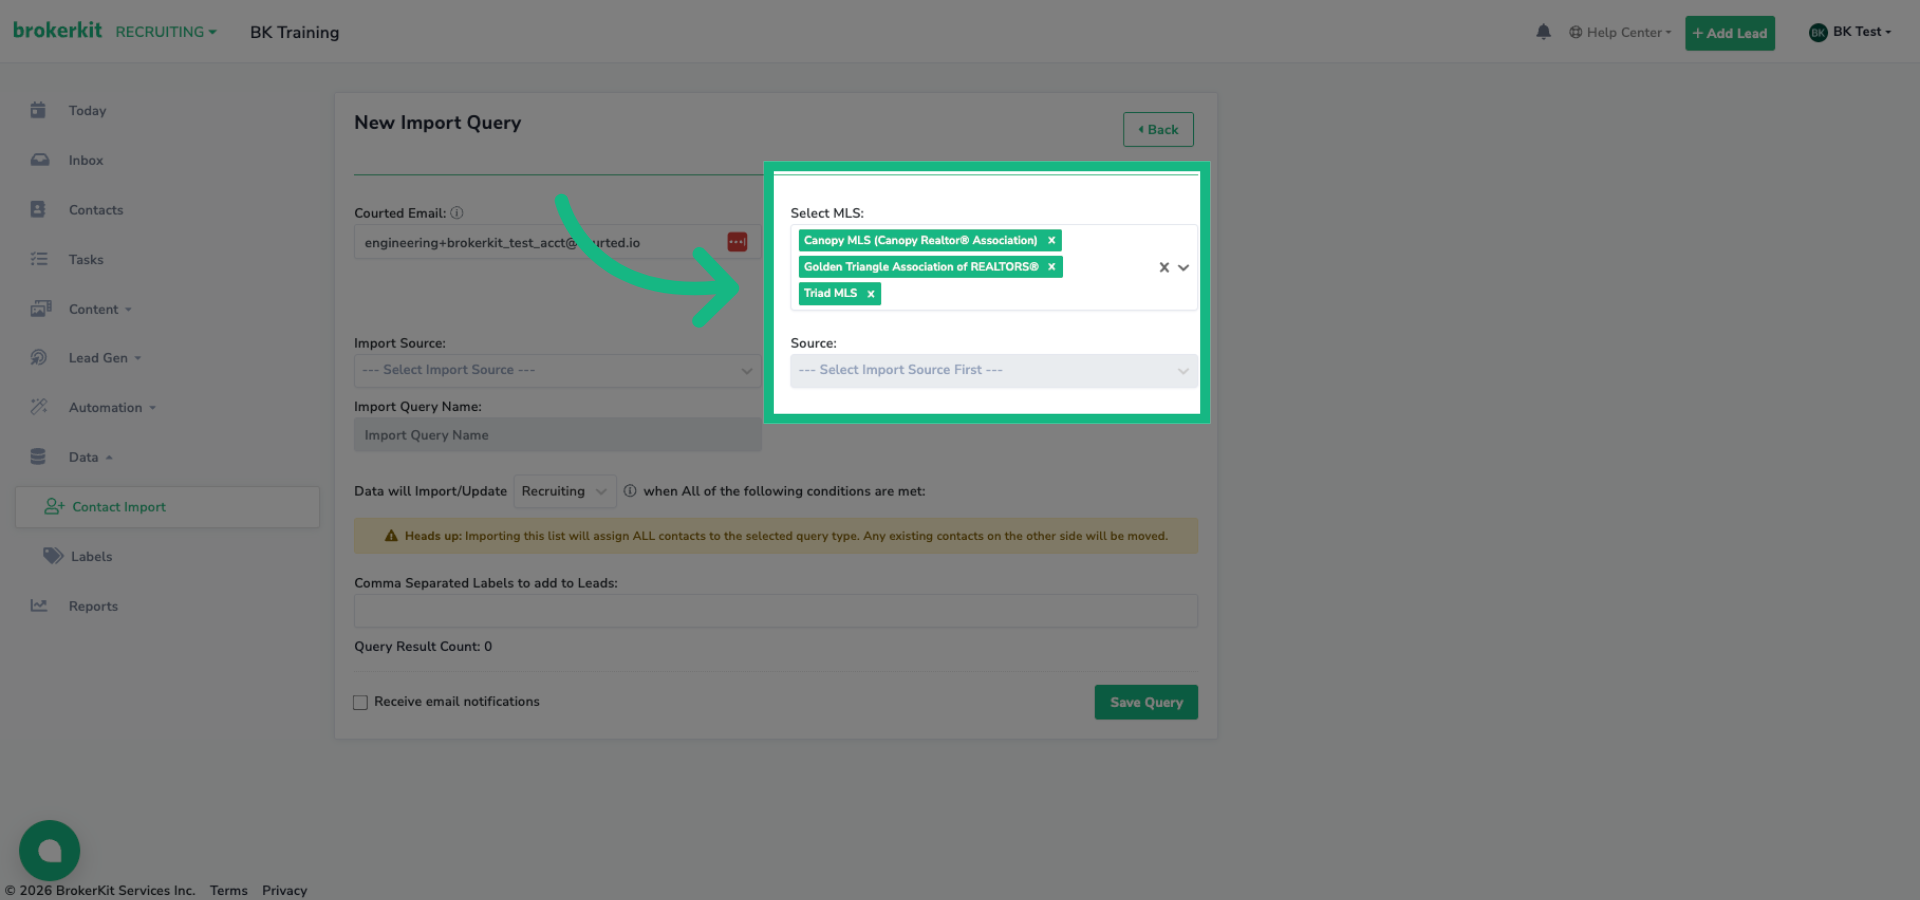
23. MLS Multi Select
Next, select the MLSs you want to import agents from. Only MLSs that have been configured with your Courted API key will appear here.
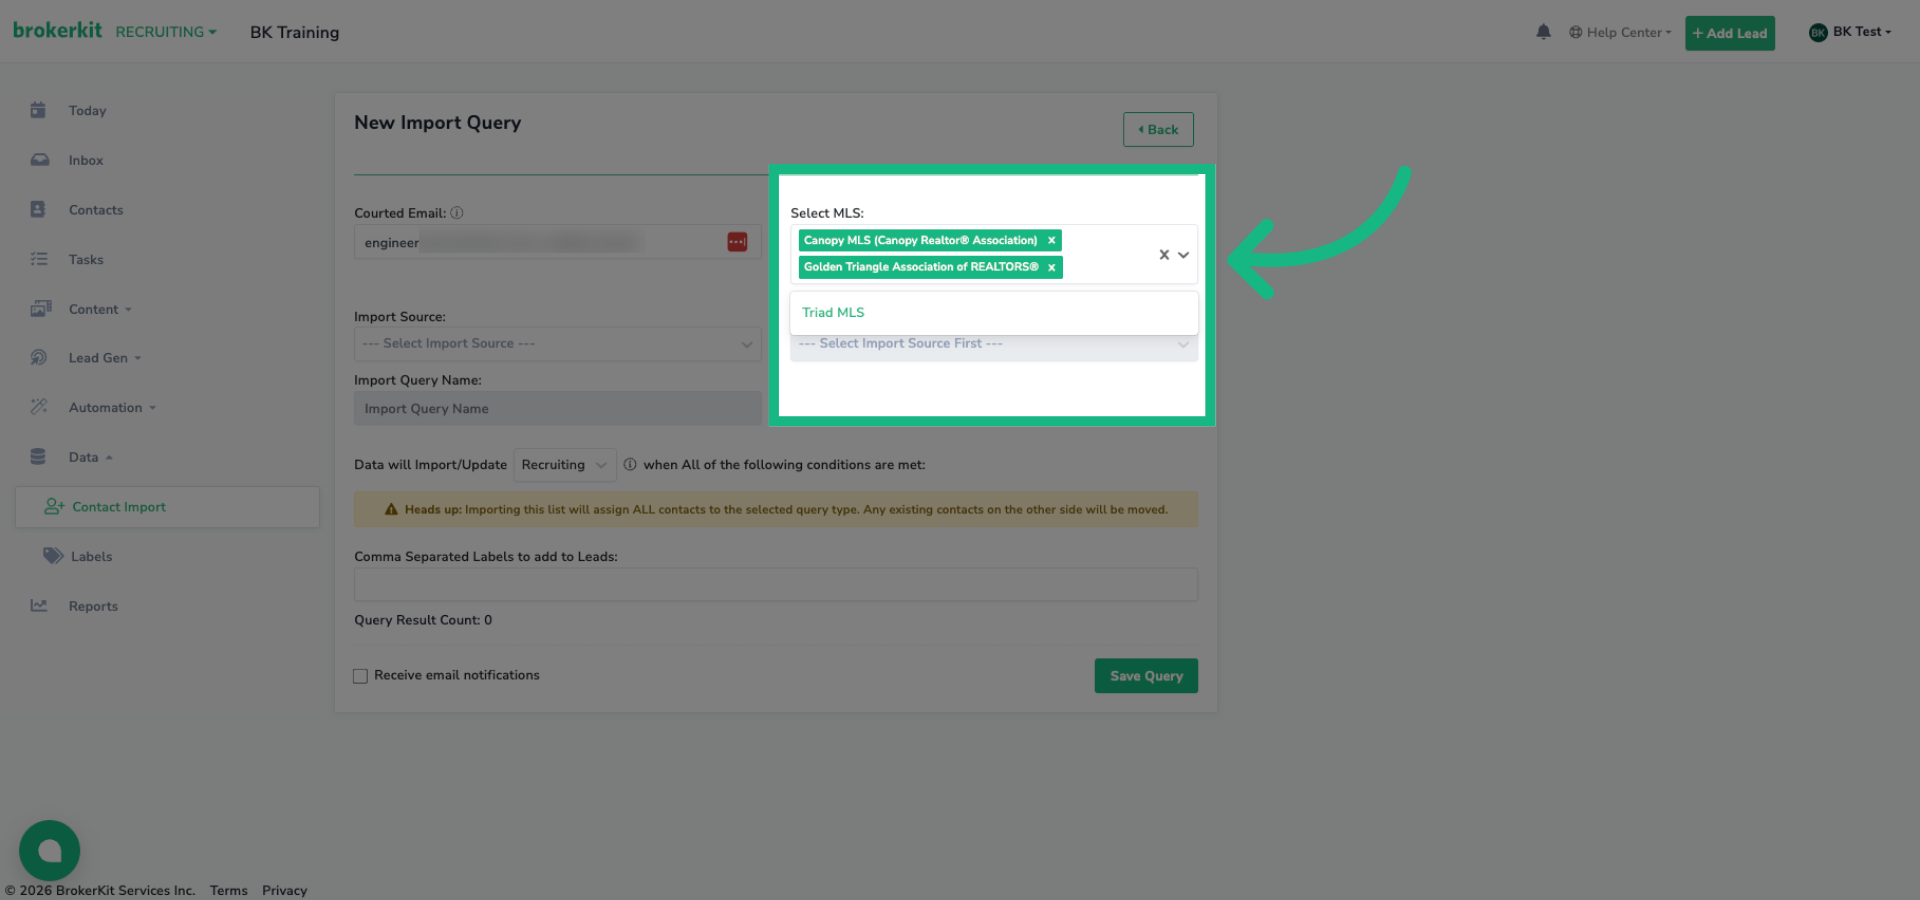
24. Review Selected MLS Options
You can select multiple MLSs. Selected items show as green tags. Click the X to clear all selections if needed.
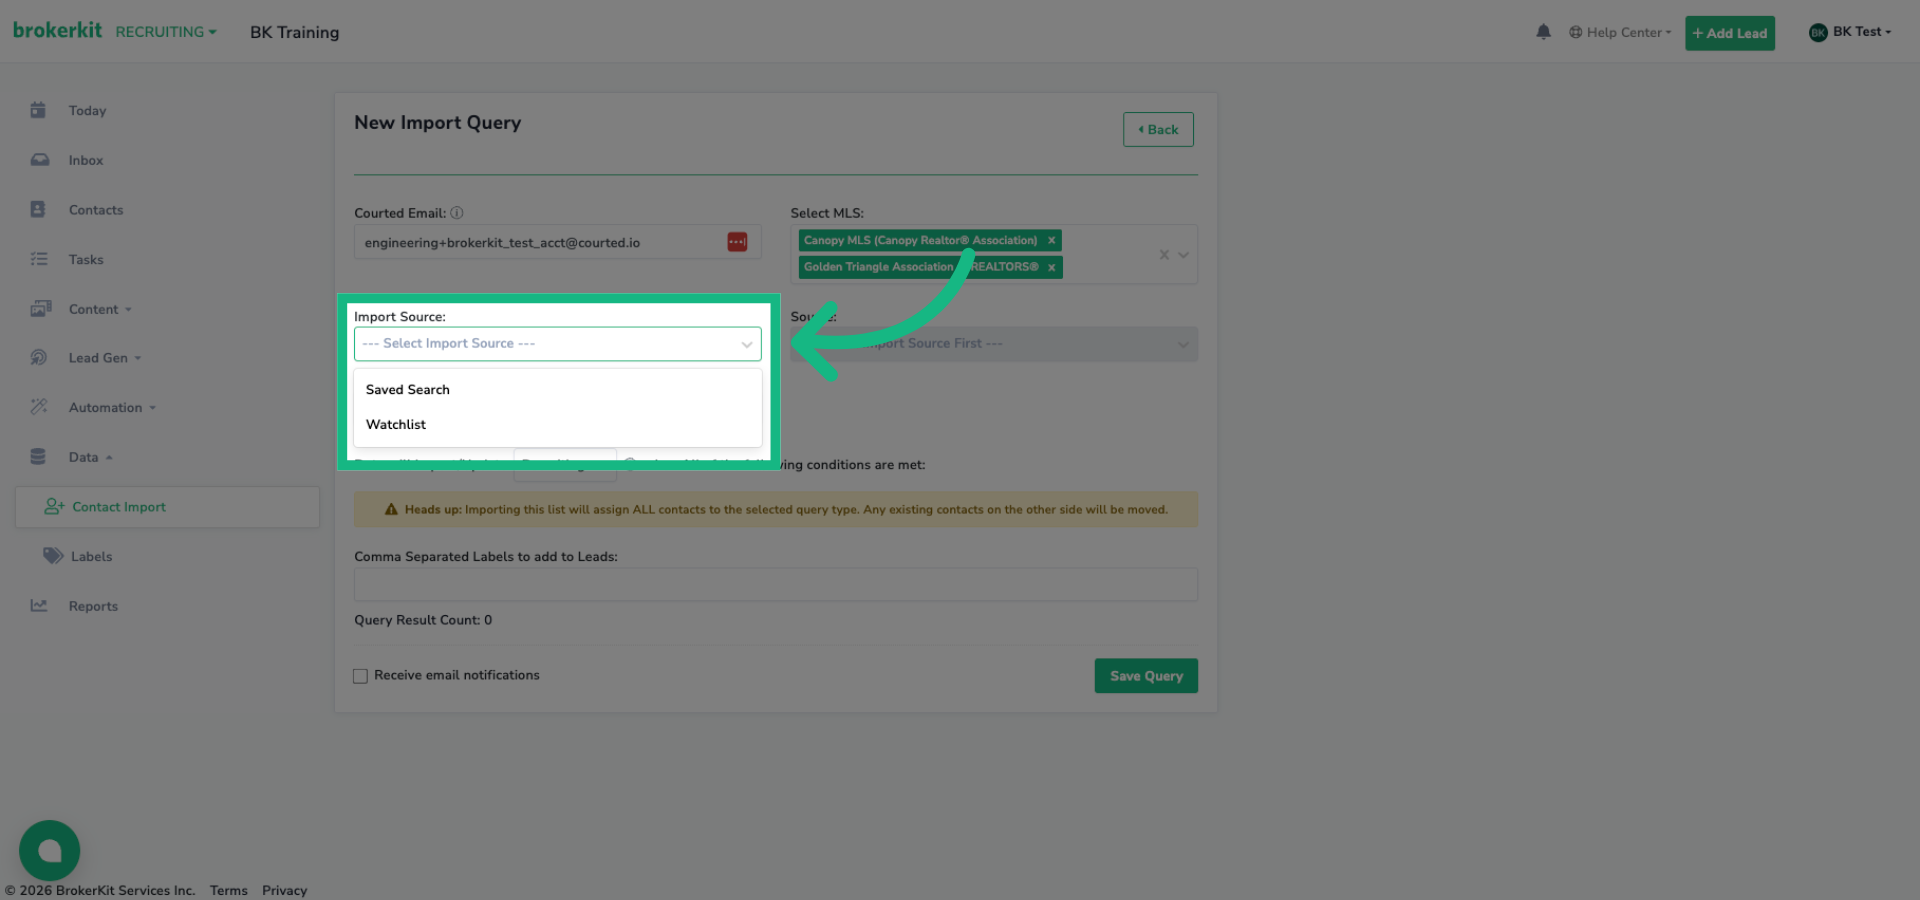
25. Import Source
The Import Source dropdown lets you choose between importing from a Watchlist or a Saved Search. Both options pull contact data from Courted, but watchlists are curated lists you've created, while saved searches, are dynamic queries, that update automatically.
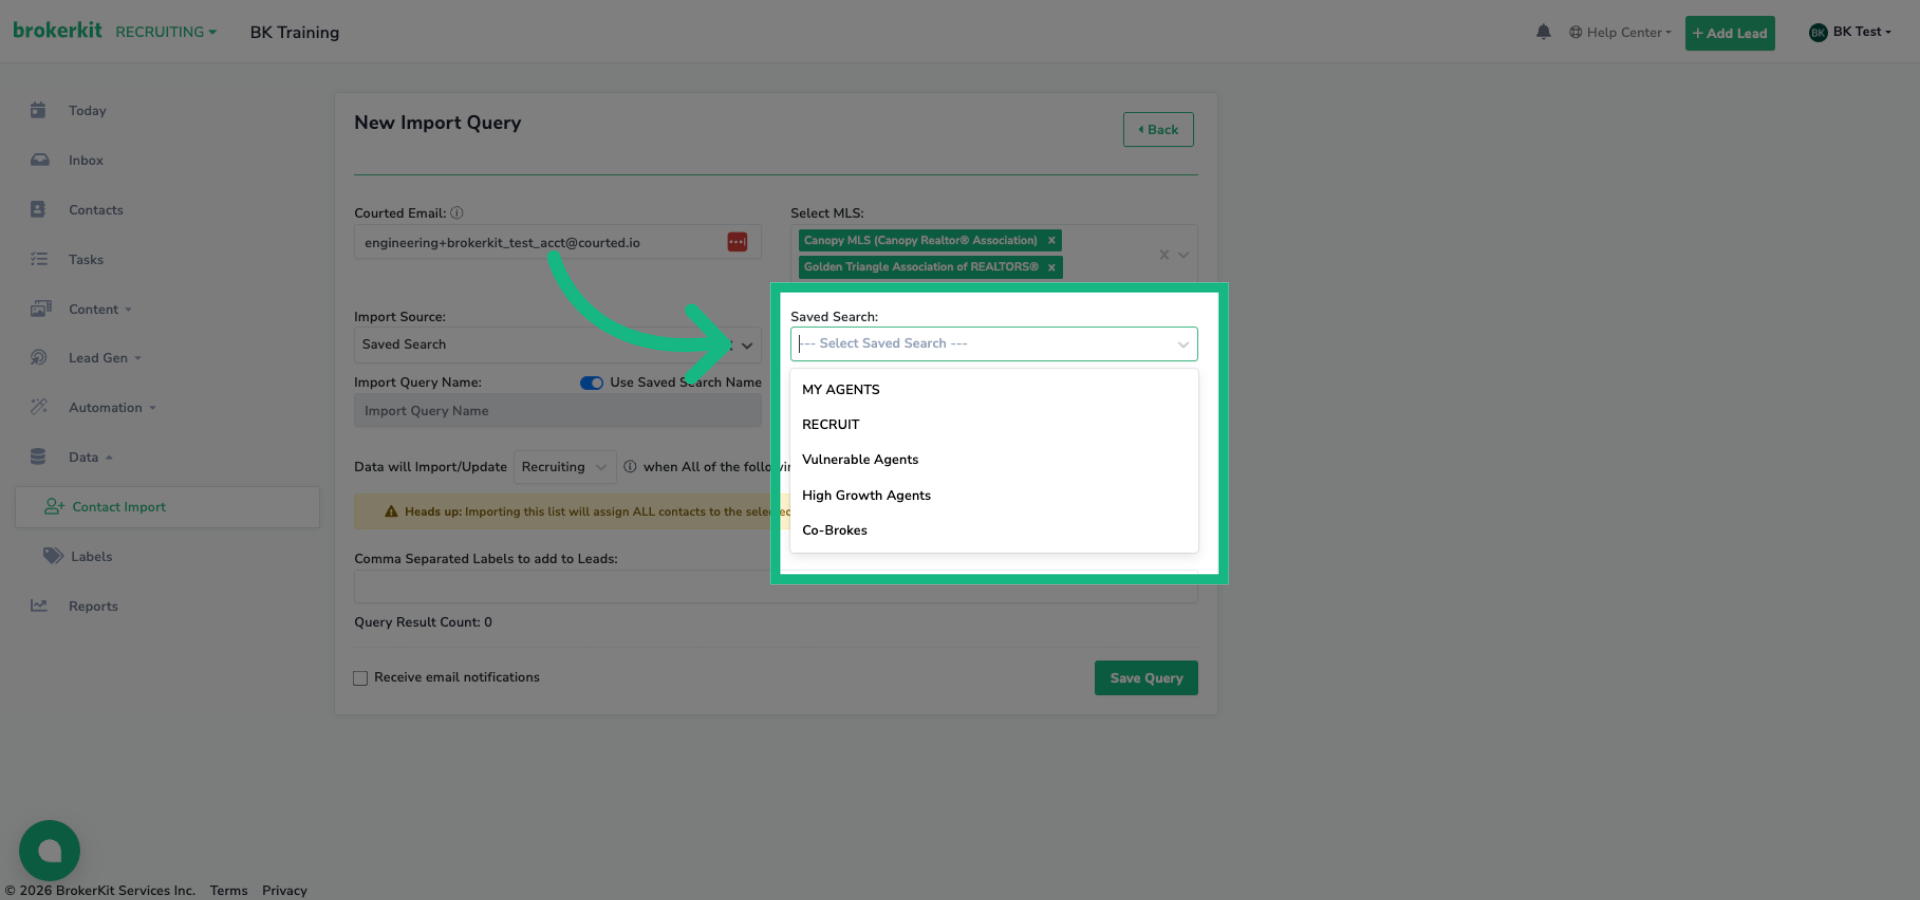
26. Watchlist or Saved Search
Once you select an import source, the Source List dropdown becomes active. This will show all watchlists or saved searches associated with your Courted email. Select the one you want to import.
27. Naming the Query
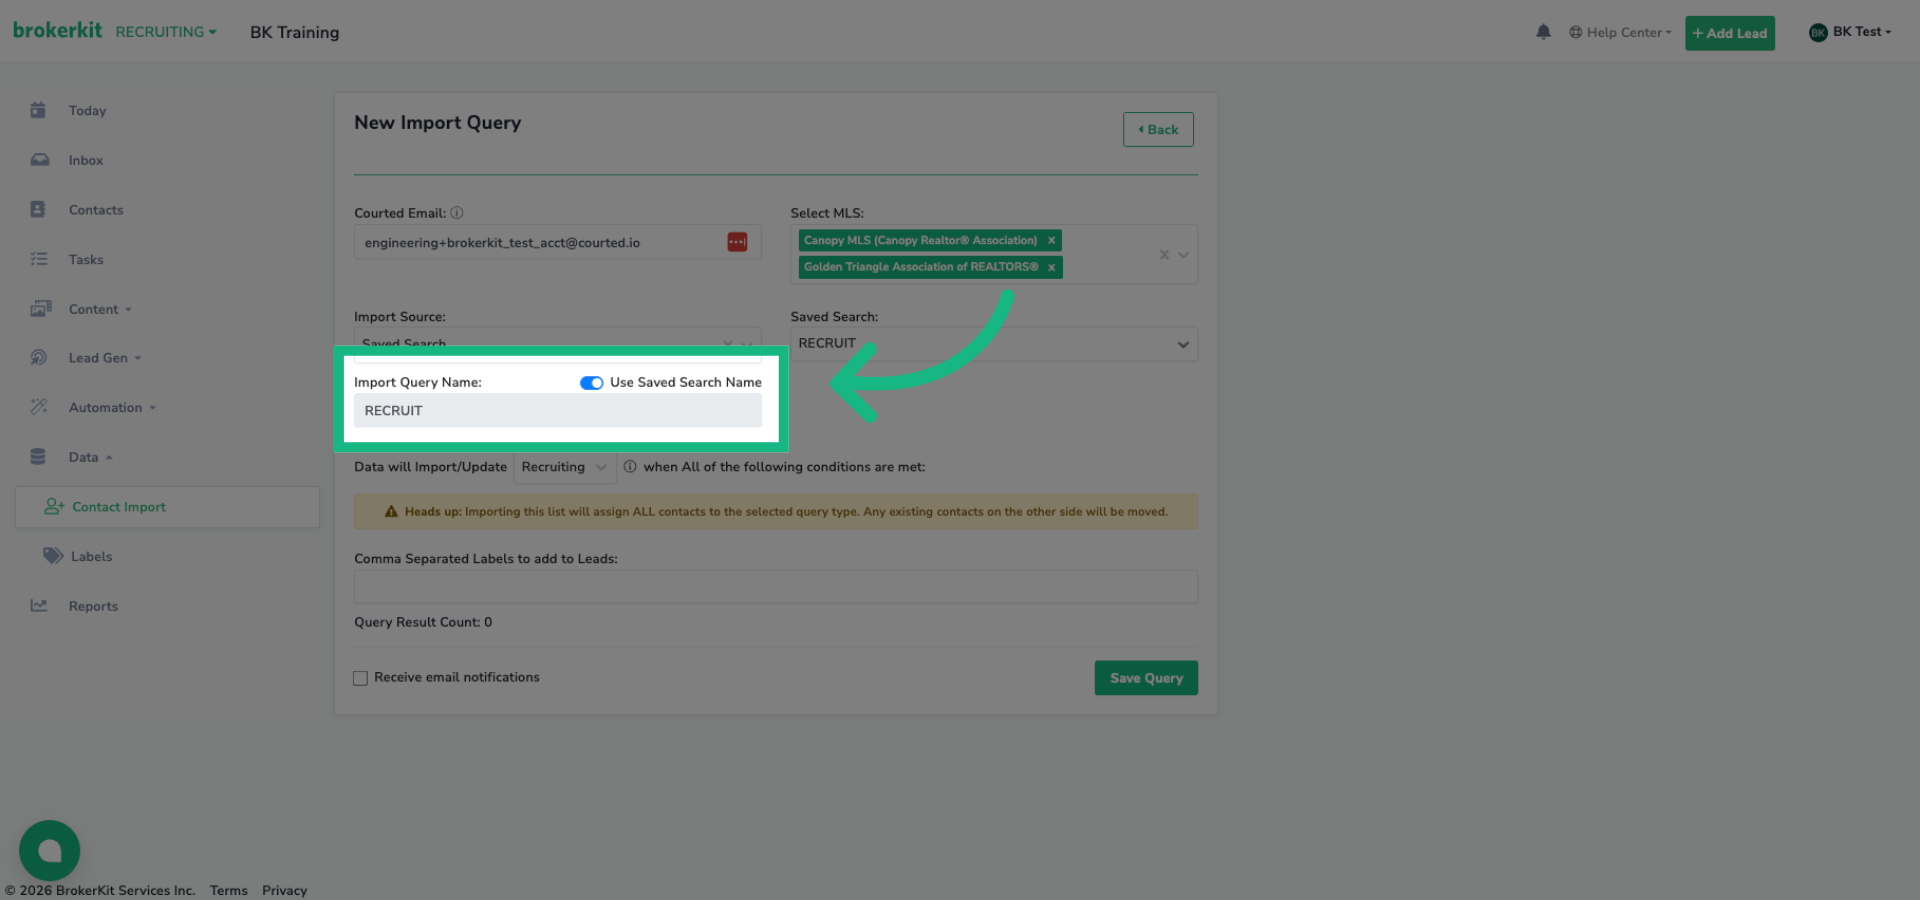
The Import Query Name field lets you name this import. By default, 'Use watchlist or saved search name' is toggled on, which automatically uses the name set in Courted. Toggle it off if you want to enter a custom name.
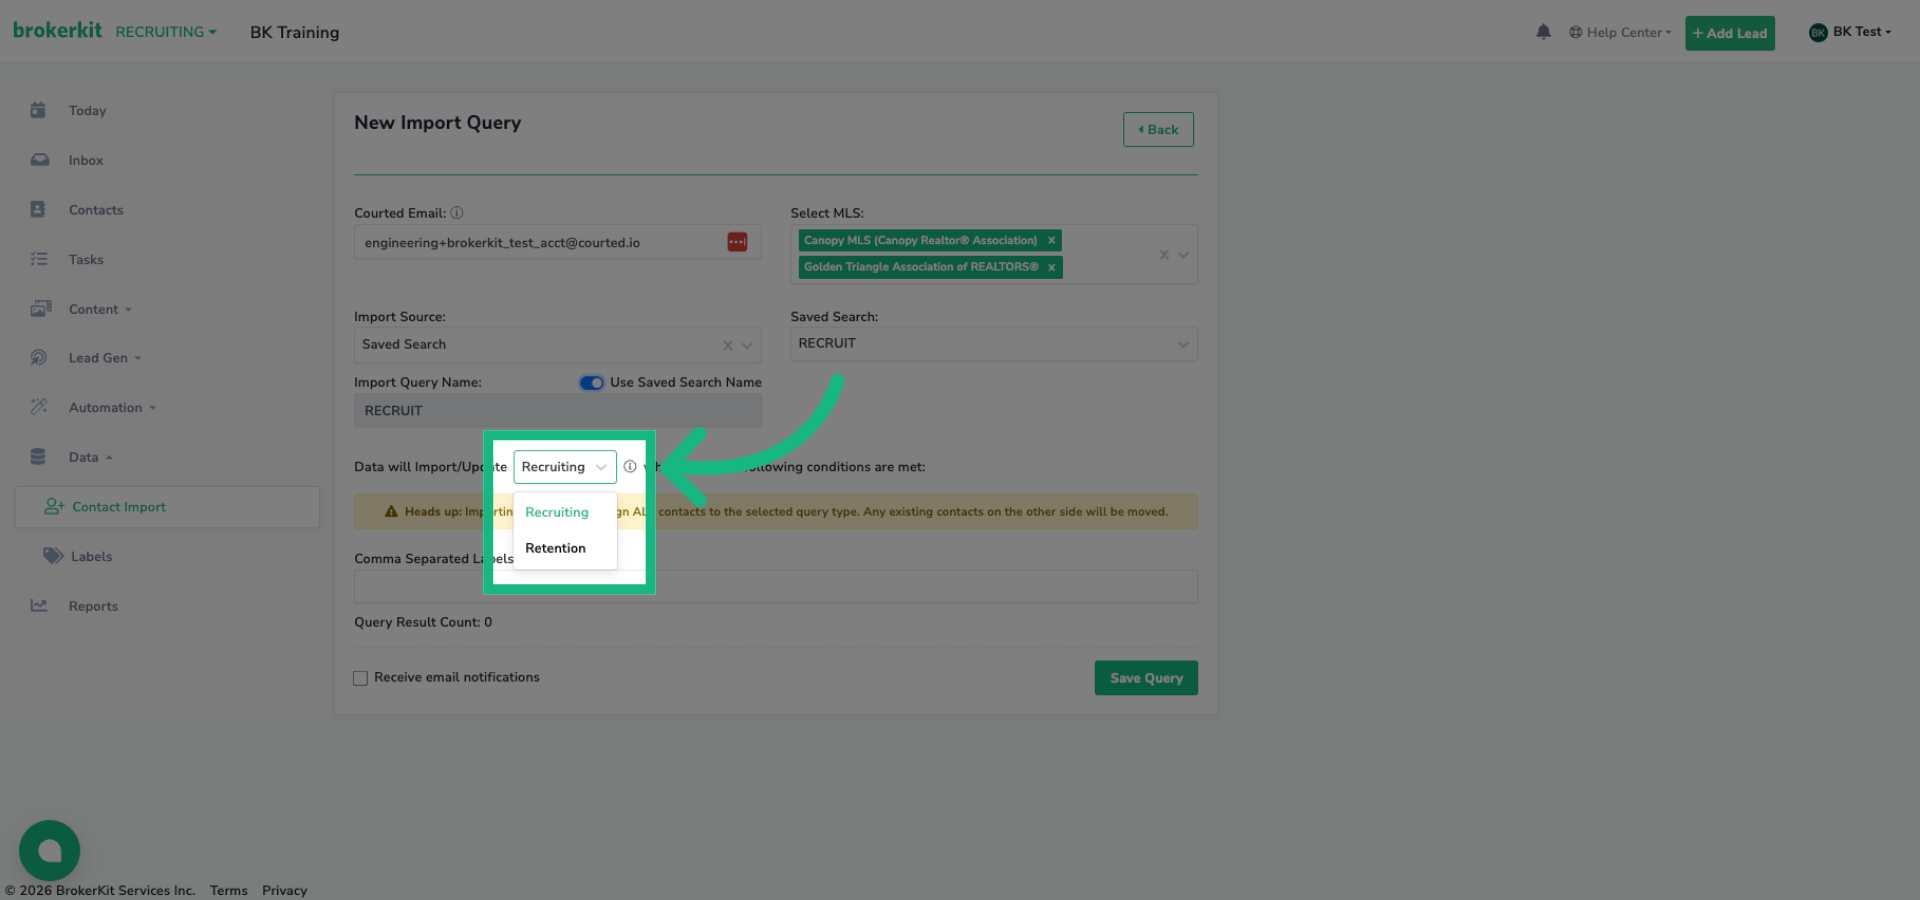
28. Select "Recruiting" or "Retention"
This important dropdown determines whether imported contacts go into your Recruiting or Retention pipeline. Choose Recruiting for contacts you want to recruit to your brokerage, or Retention for contacts already with your brokerage that you want to track.
29. Review Import Query Summary
Pro tip: Keep your Courted lists separate: one for recruiting, one for retention. When you import, whichever option you choose applies to the entire list. Mixed lists mean some contacts will end up in the wrong place.
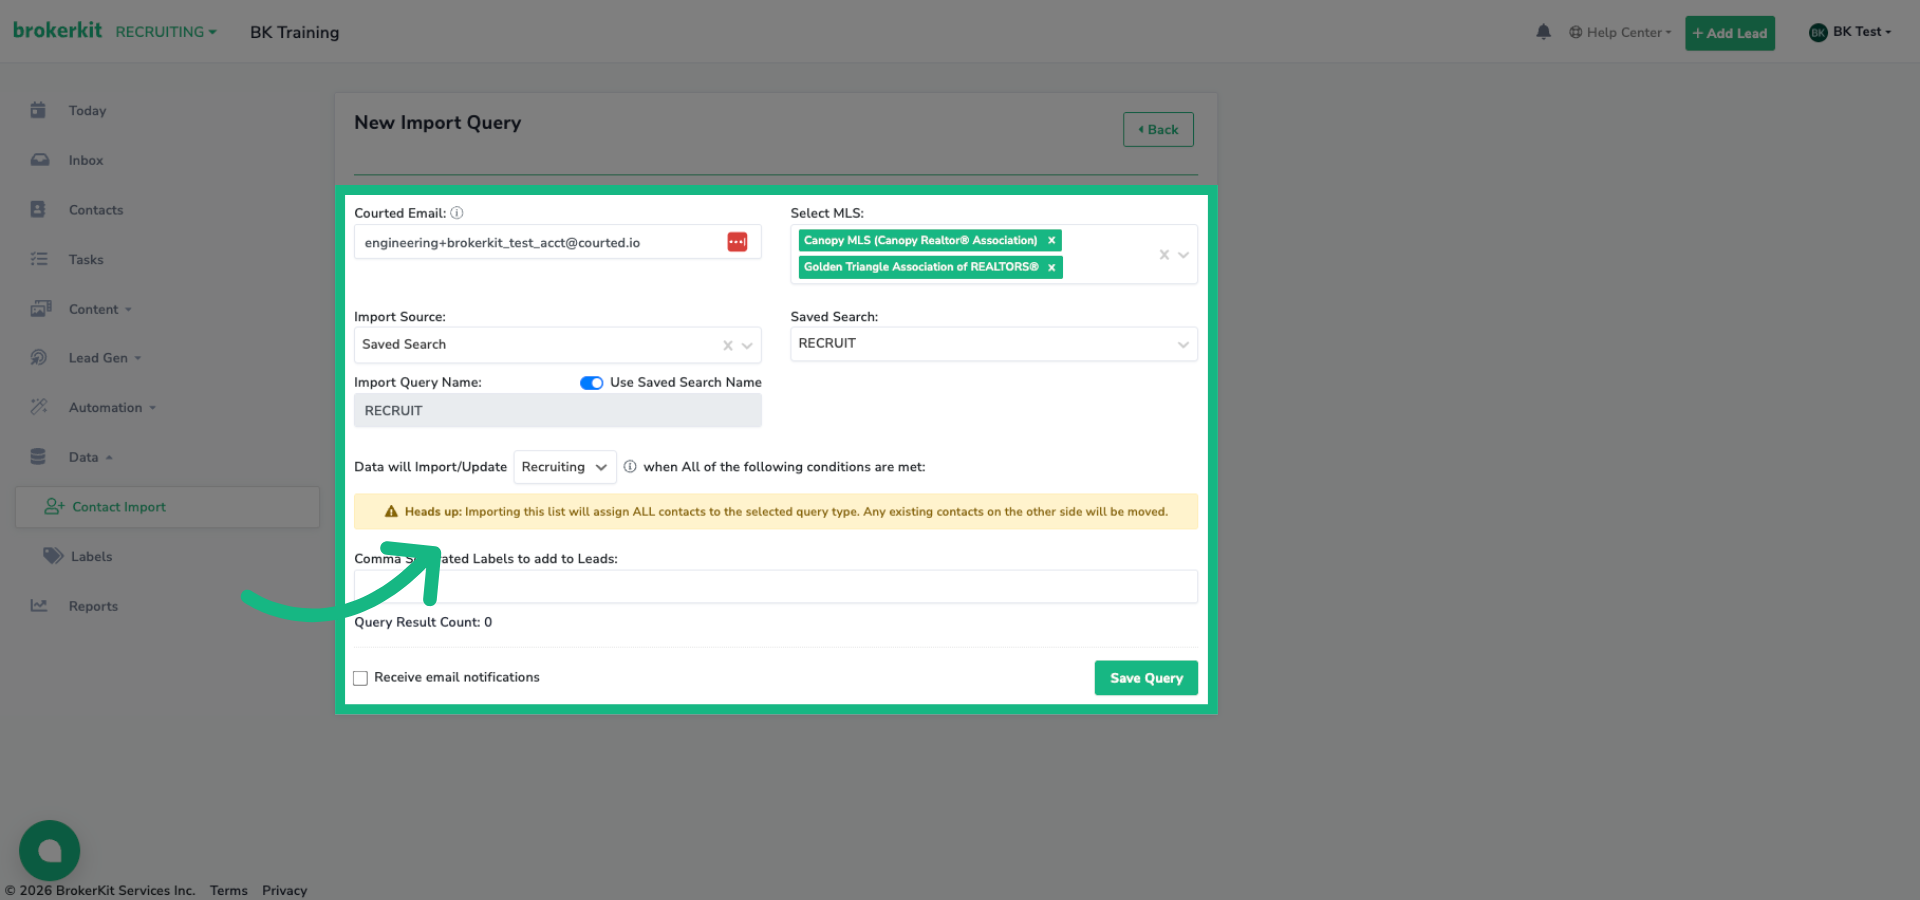
30. Add Labels
You can add labels that will be automatically applied to all imported contacts. Enter comma-separated labels like 'Courted Import' or 'High Potential' to help organize your contacts.

31. Activate Email Notifications
Enable email notifications if you want to receive emails when imports complete or encounter issues. This is off by default.

32. Save Import Query
When everything is configured, click Save Query. Brokerkit validates your settings - if anything is missing, you'll see specific error messages.

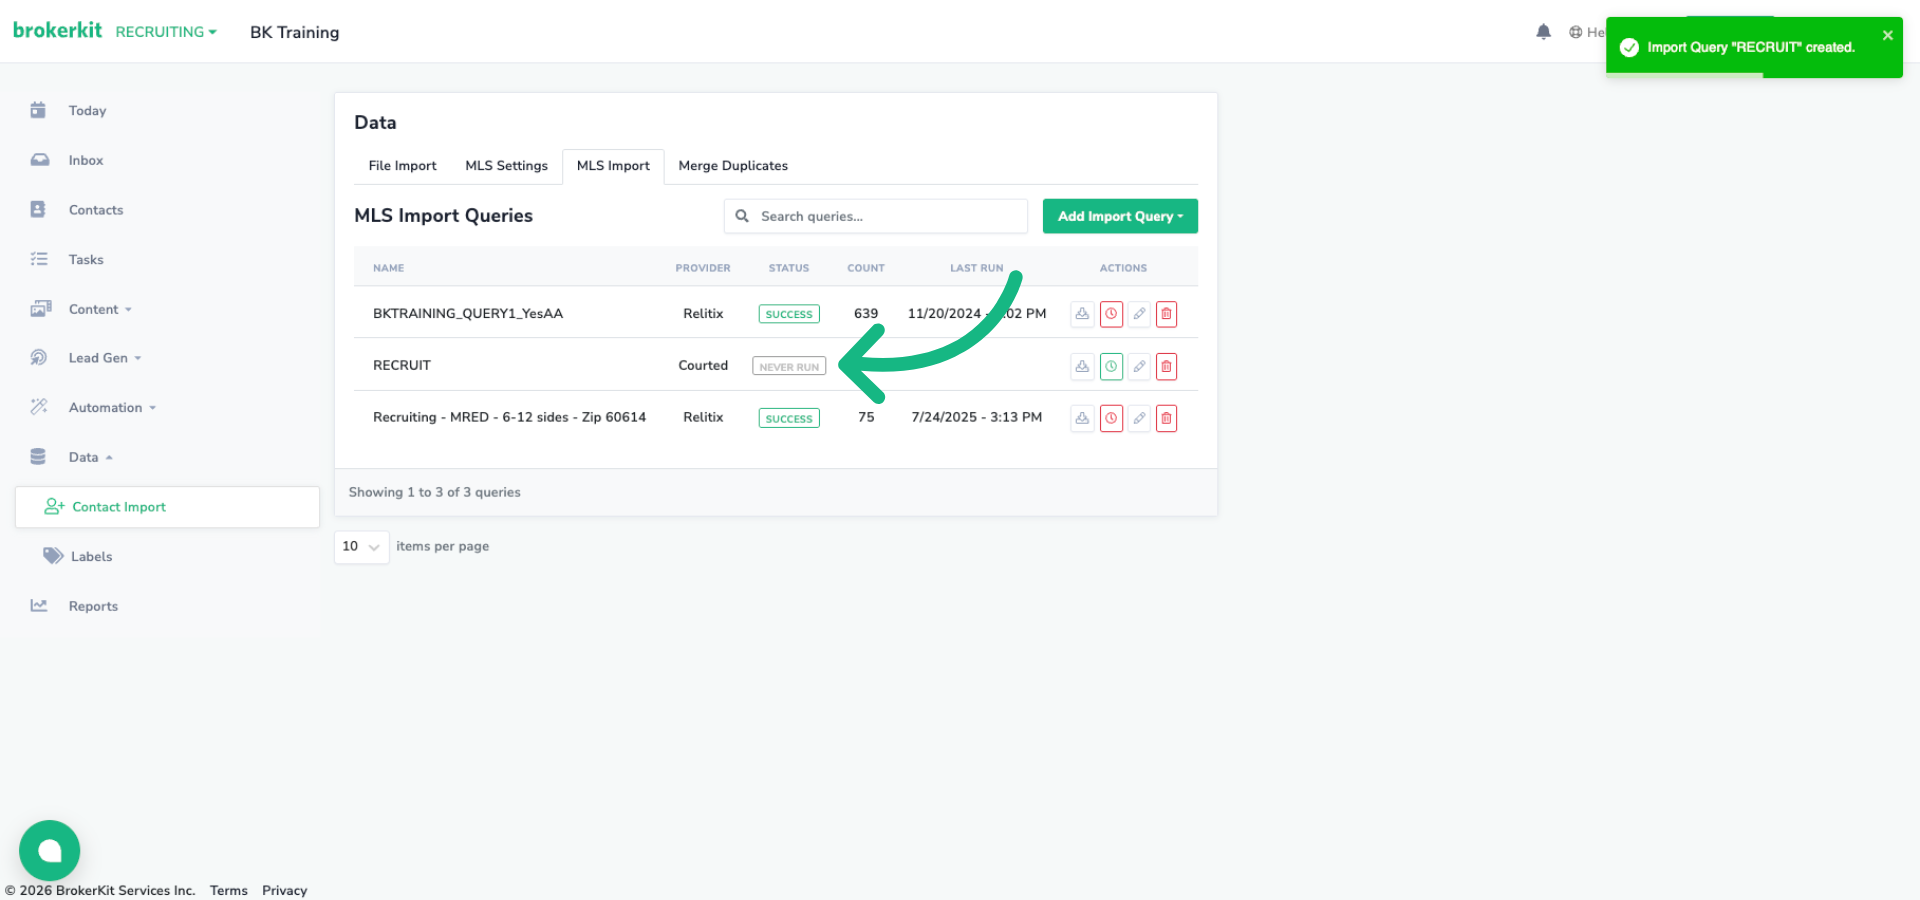
33. MLS Import grid
Your import query now appears in the MLS Import grid. You can see its name, provider shows 'Courted', and the status is 'Never Run' since we just created it
34. Trigger the Import
To run an import immediately, click the Trigger Query Import button. This starts a manual import right away.

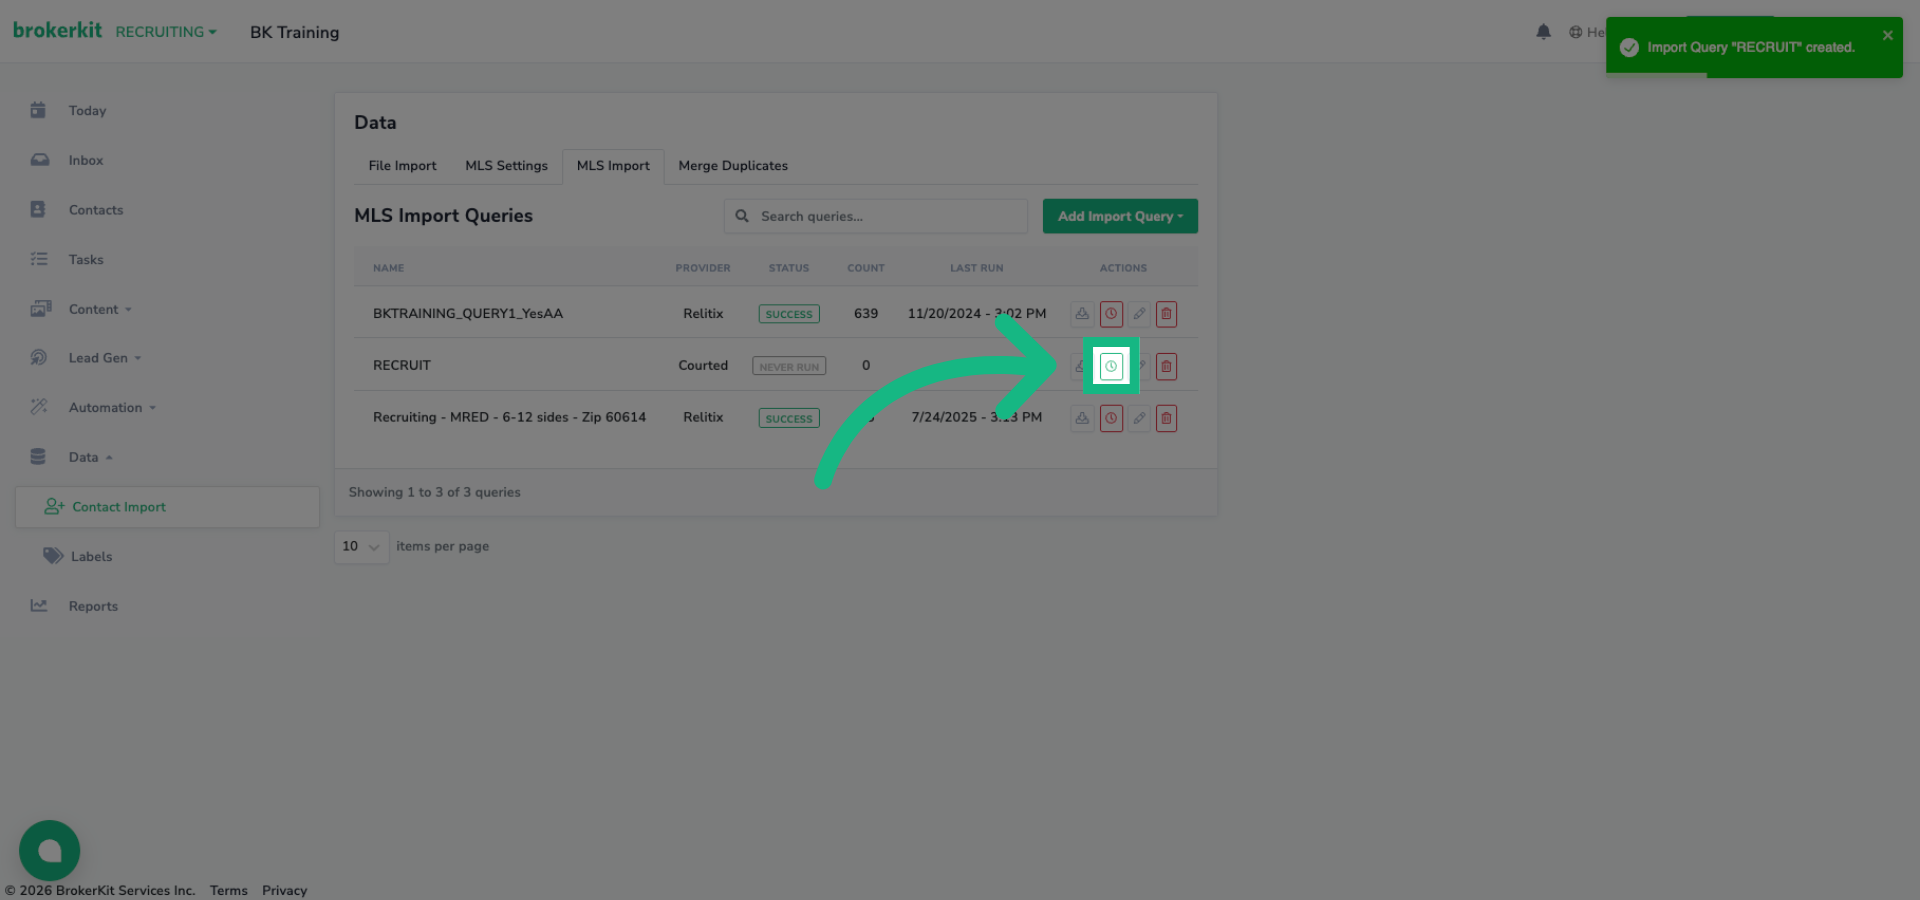
35. Nightly Schedule
The schedule button controls nightly automatic imports. By default, it's enabled - your query will run automatically every night to capture any updates from Courted. Click it to disable scheduled imports if you prefer manual control.
36. Confirm Import Start Notification
You'll see a confirmation that your import has started. If you enabled email notifications, you'll receive an email when it completes.

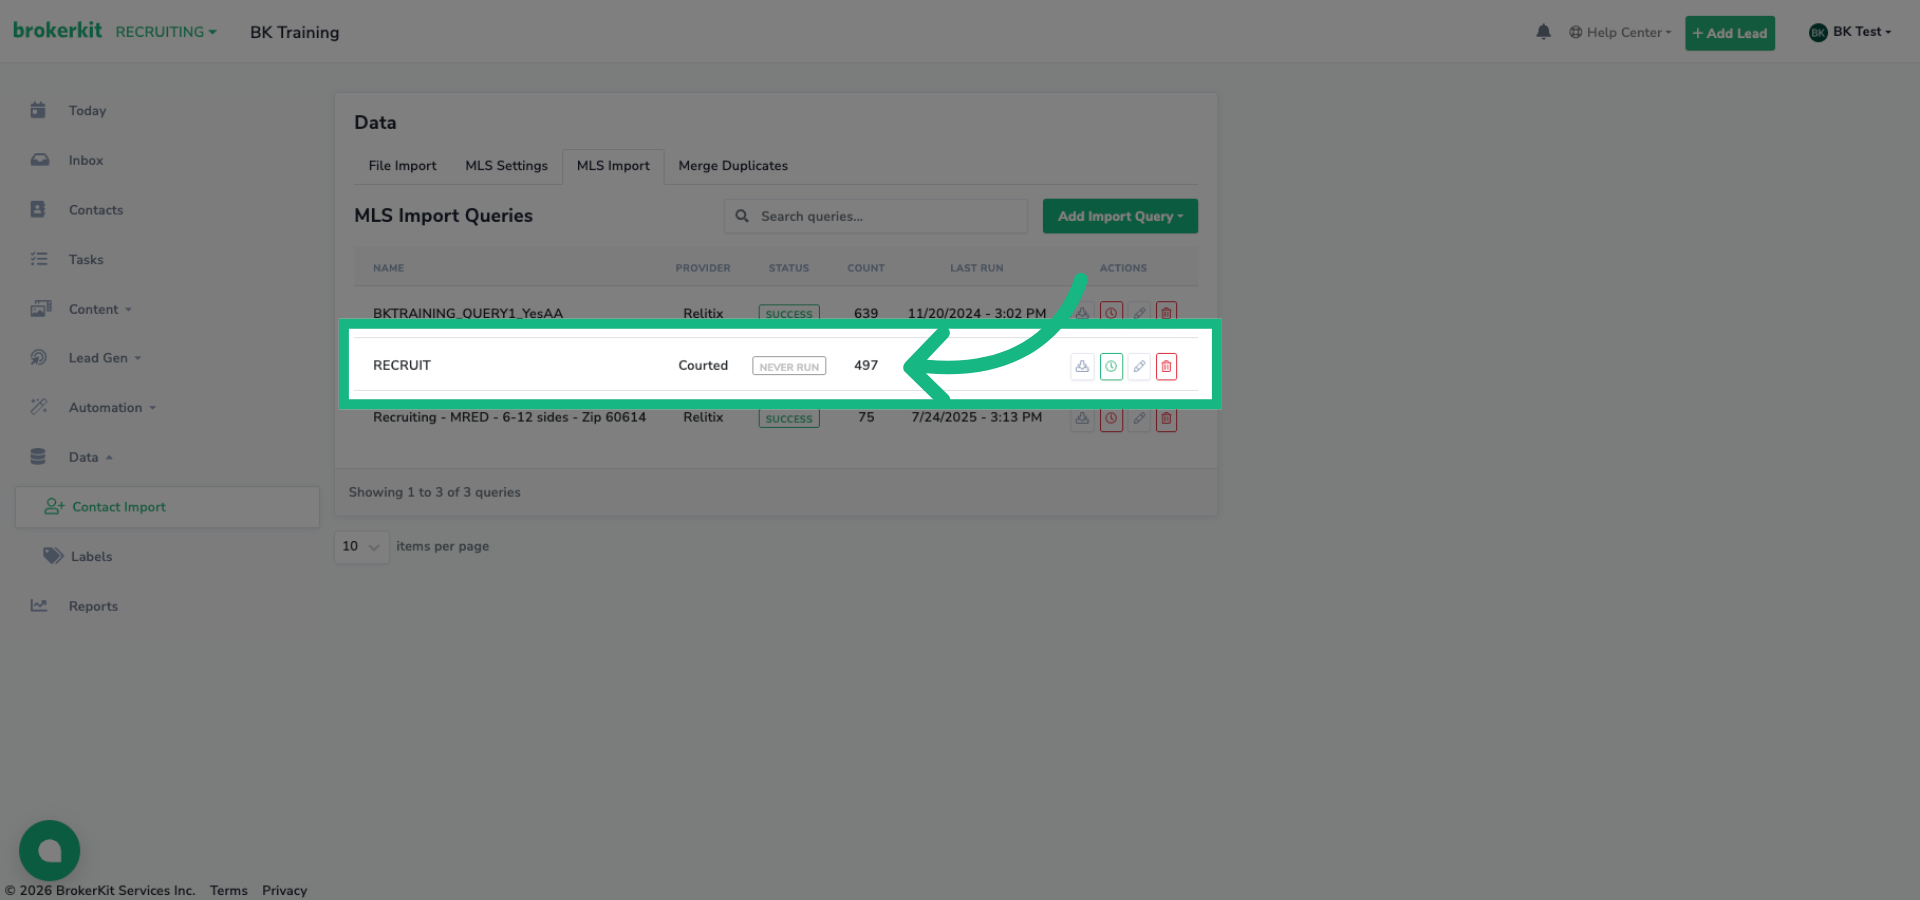
37. Query Count
Notice the Query Result Count shows how many agents are in your selected watchlist or saved search. Courted has a maximum export limit of 1000 contacts - if your query exceeds this, you'll see a warning. Consider refining your watchlist or saved search in Courted if needed since only the same first 1000 contacts will be imported each time.
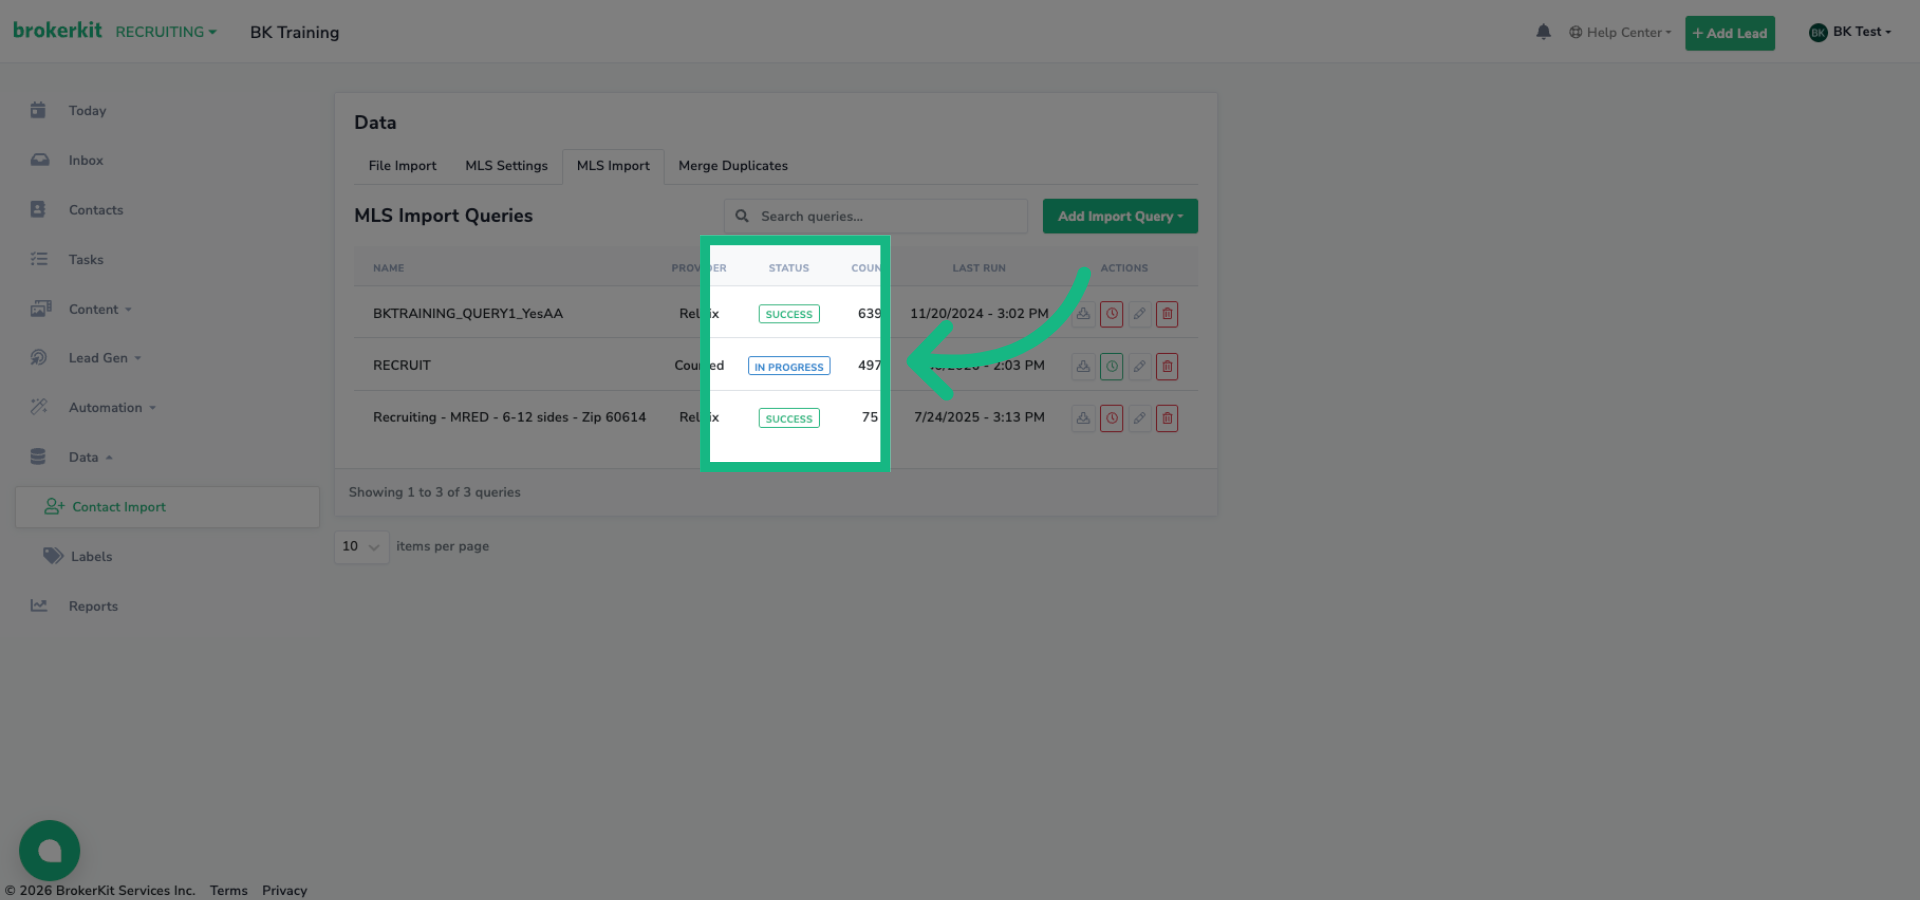
38. Status
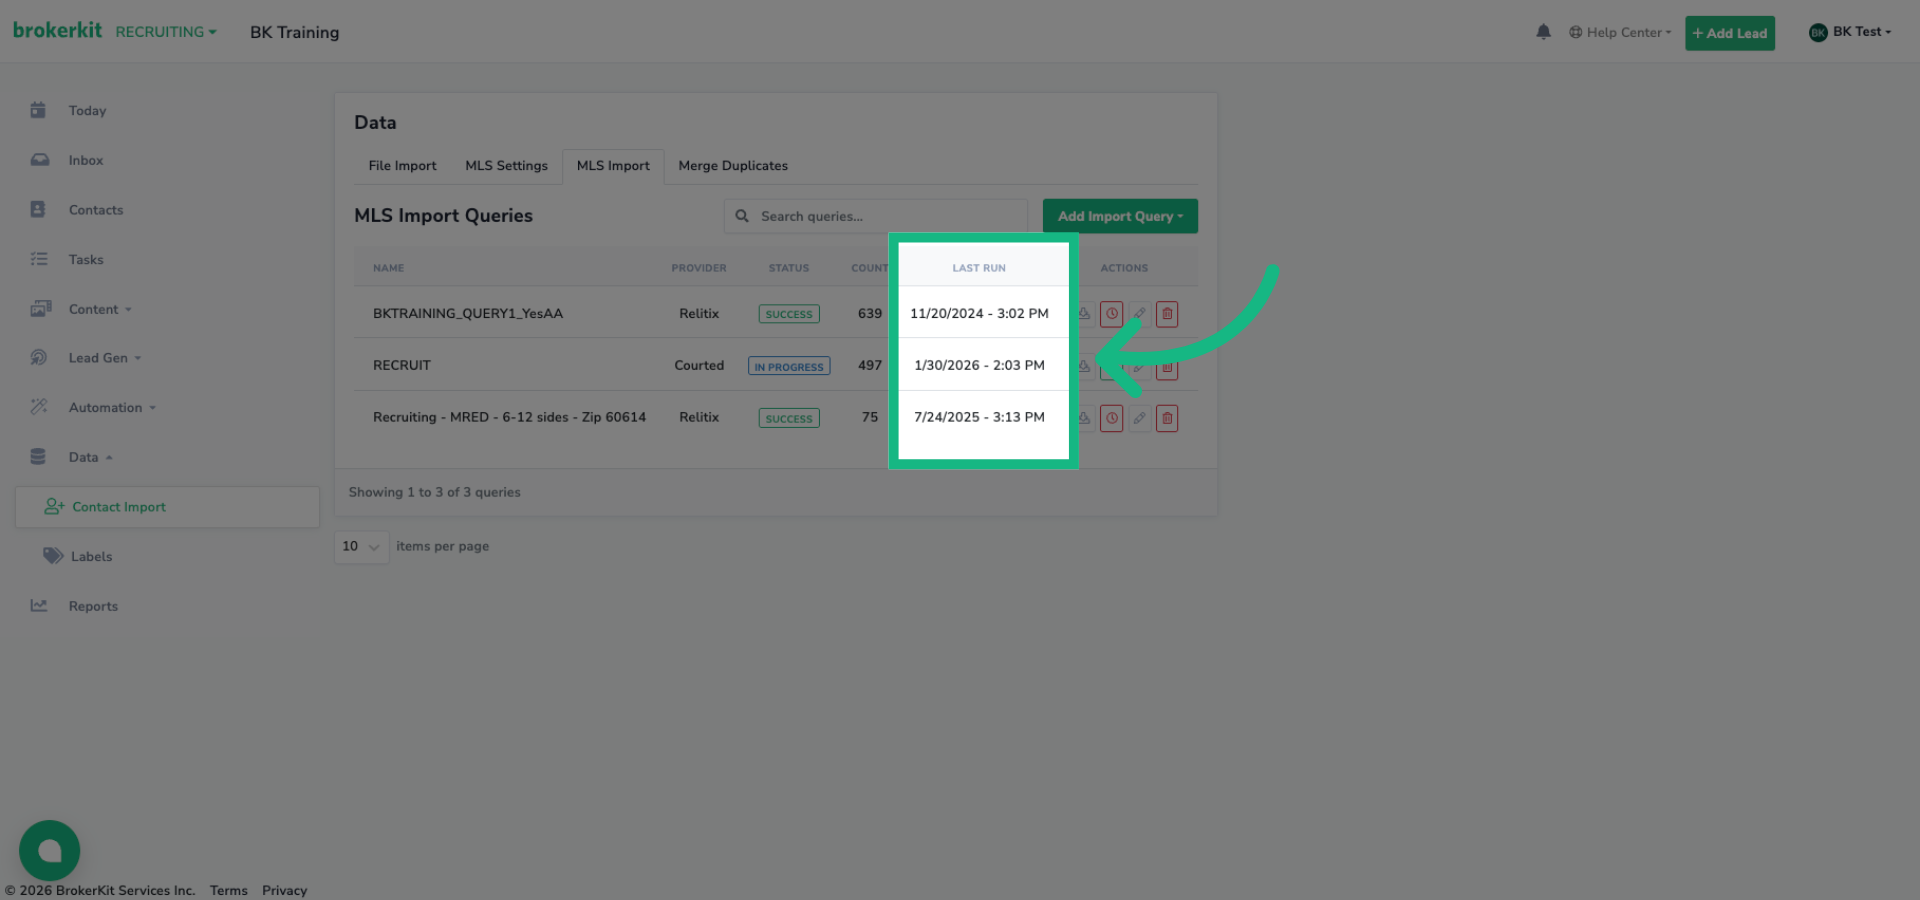
The query status updates as the import progresses - from In Progress to Success.
39. Last Run
The Last Run column shows when the import is completed.
40. Partial Fail
If any issues occur, you'll see Failed or Partial Fail with tooltip explanations. For example
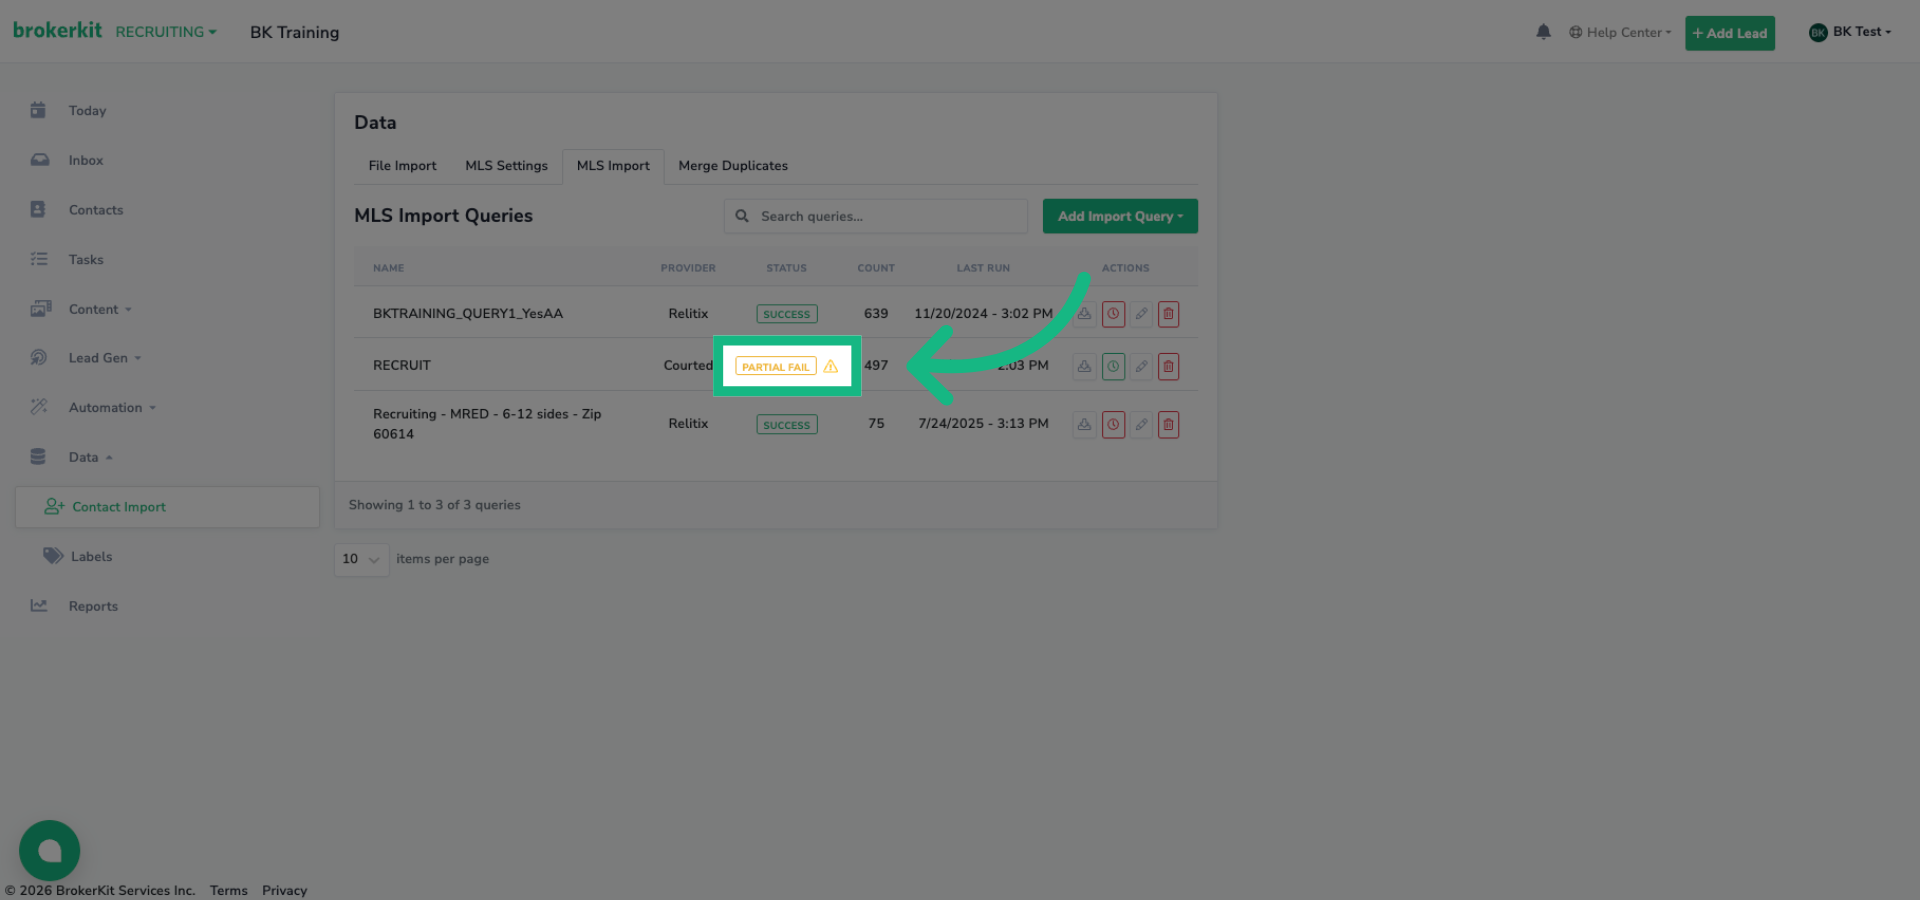
41. Review Partial Import Notice
Partial Fail status: it tells you exactly how many contacts were skipped and why. Usually, this happens because your watchlist or saved search contains contacts from MLSs that weren't selected in your query.
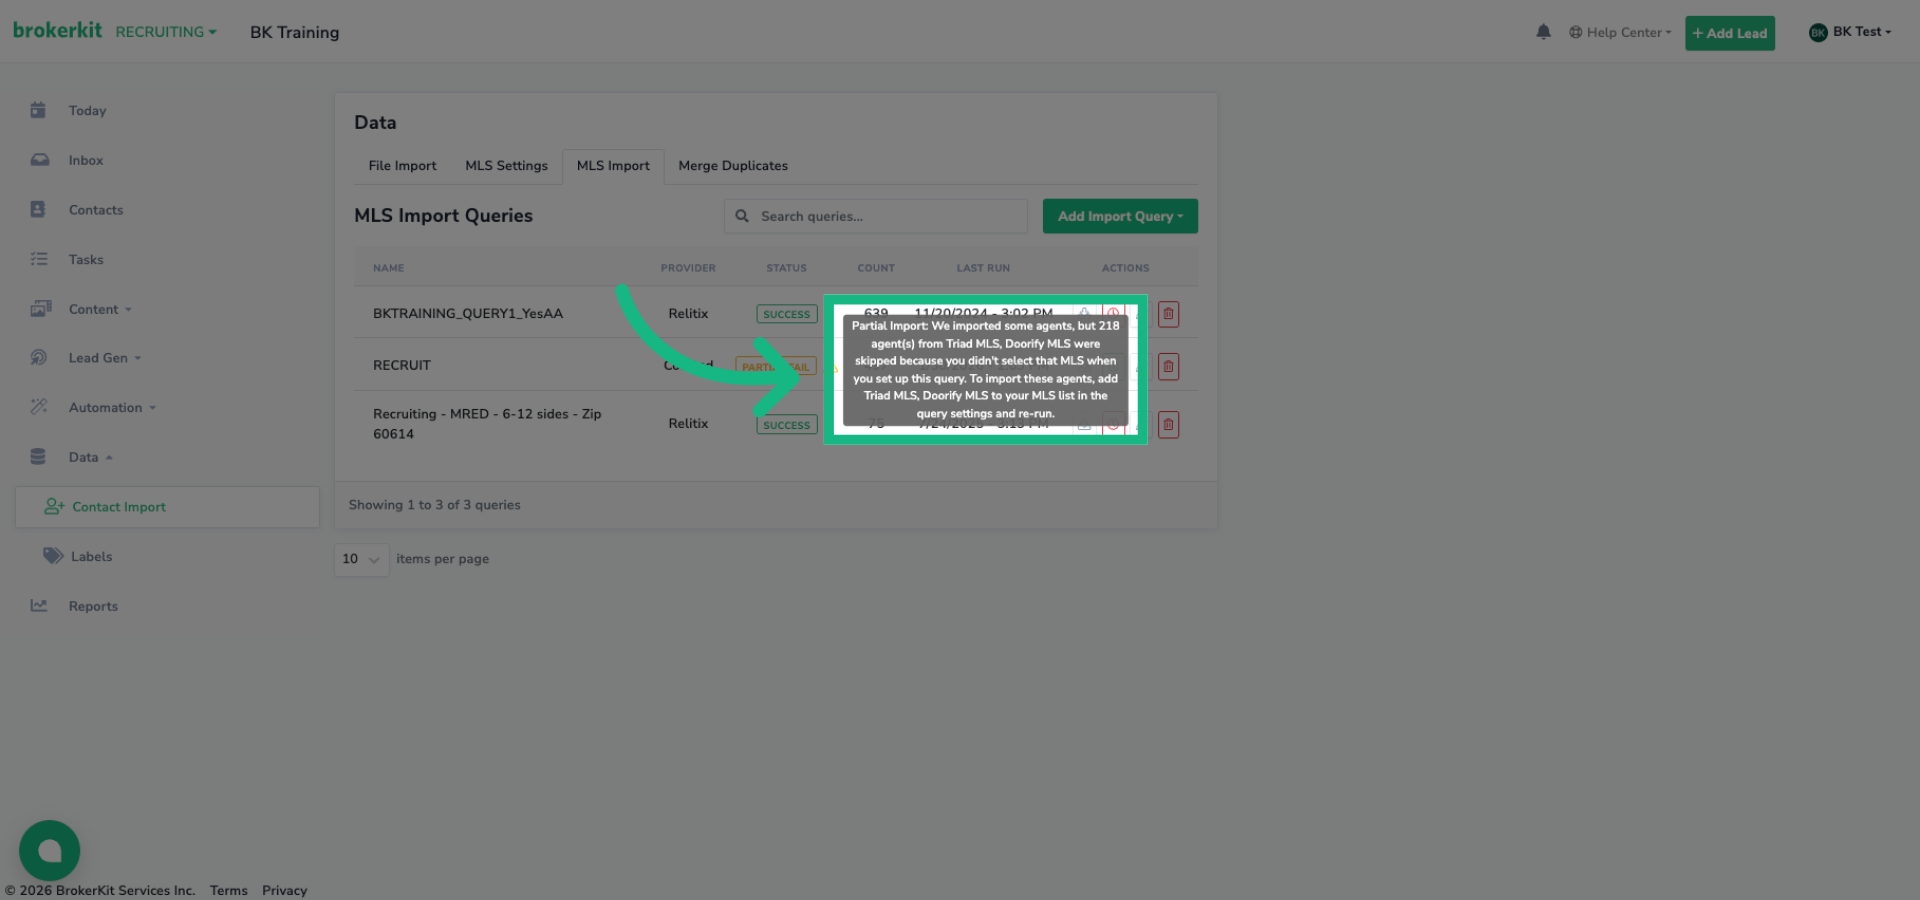
42. Add missing MLSs to query dropdown
Simply edit the query, select the additional MLSs from the dropdown, and re-run the import to capture those missing agents.

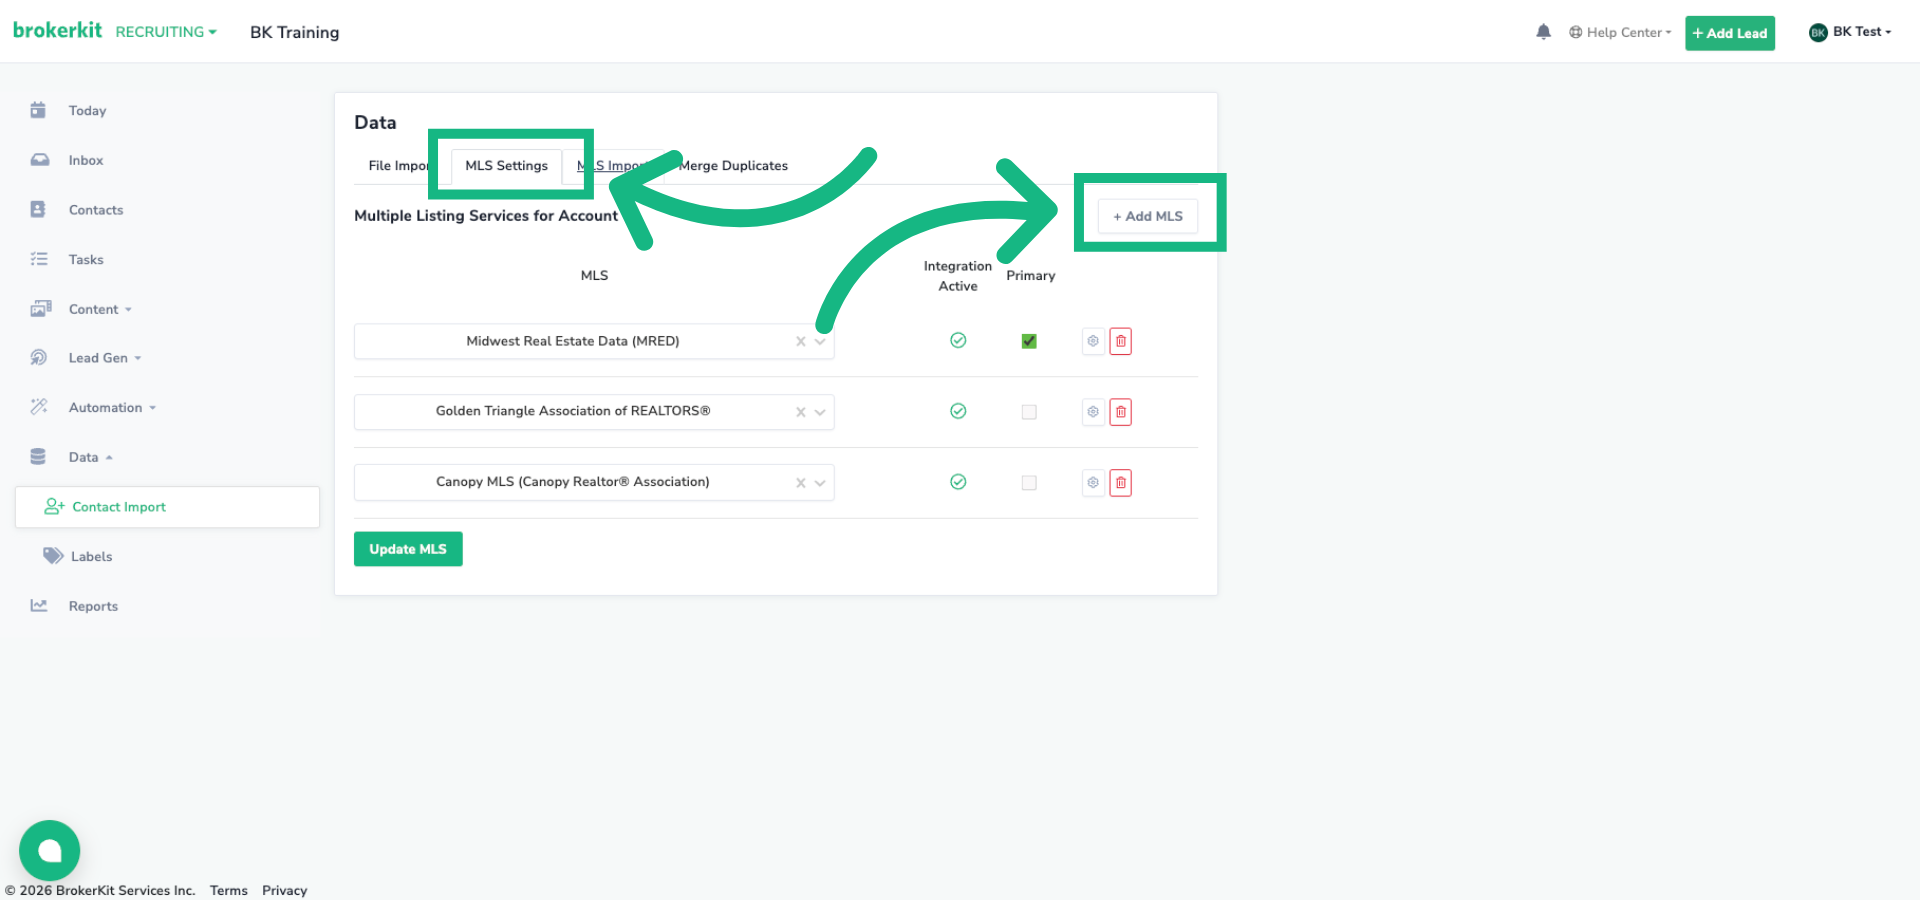
43. MLS Settings to add missing MLSs in the query dropdown
Now, if you don't see an MLS listed in the dropdown at all, that means it hasn't been configured yet. Head over to MLS Settings tab, and add that MLS with your Courted API key. Once it's configured there, it'll appear in your query dropdown for you to select.
You have successfully configured the Courted integration within Brokerkit, ensuring seamless synchronization between Courted and Brokerkit. Thanks for watching. Please reach out to support@brokerkit.com for any questions.
How many API calls does a Courted pull or reconciliation use?
The number of Courted API calls used in a sync depends on what kind of pull you are running:
- Standard monthly Courted integration pull (recruiting or retention). The integration pulls roughly one API call per agent per active query. Total volume for a normal monthly refresh is approximately the number of agents in your queries times the number of queries you have configured.
- Reconciliation (recruiting or retention). A reconciliation requires more API calls because BrokerKit pulls the data both ways to compare against the canonical Courted dataset. The BrokerKit team has to pull all queries for all agents and pull every matching contact in BrokerKit, then run queries on those to compare. Volume can be up to roughly double the agent count in the recruiting or retention scope being reconciled, depending on overlap.
Reconciliations are run on request through Customer Success — they are not a routine self-serve flow today. If you need a specific call-volume estimate before scheduling one, contact your CS or onboarding lead at support@brokerkit.com with the scope (recruiting only, retention only, or both, and the number of agents involved) and we will produce an estimate.